Hi folks,
I posted yesterday (
here) the player briefings for Sundays big game with 'The Old Guard Wargames Club' in Northallerton, North Yorkshire. I was pretty beat last night when I got home - but running a big game for 6 players will do that to you!
This game was the fourth in the series of linked games we've played (or at least, club members have participated in!). It started with (#1) 1/6th South Staffs of 59th Infantry Division, along with tanks of 144RAC's (33 Armoured Brigade) B Squadron attacking Brettevillette on the 16th of July, 1944.
We then played (2#) the attack by A Coy, 2/6th South Staffs and A Squadron 144RAC onto Point 126 and an attempt to reach Noyers Bocage itself.
We followed this with a night battle (#3), where 2/6th South Staffs were advancing to clear a start line for the next days fighting, while being counter attacked by 9th SS Panzer Division trying to regain control of Noyers railway station.
This game was therefore (#4)! 1/6th South Staffs attacking Noyers from the orchards to the north, while a company of 2/6th South Staffs attacked from the east.
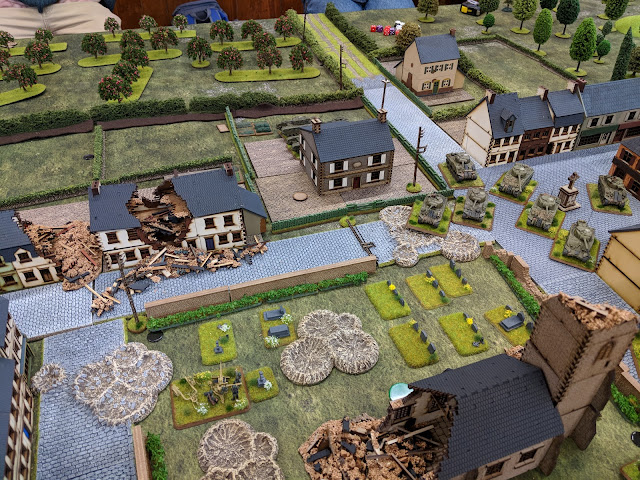
The map for the game was set up using a mixture of the map above and an aerial recon photo I have from some files on 144RAC that were photographed for me at Kew.
Hopefully, if you compare the aerial photo above to the picture at the top of this blog, you should see some resemblance! Of course, as I have a 'mobile' setup, it's very difficult to get things exactly right, but I think it was pretty close!
The table was set up using my terrain, other than the table matt/cloth, which was borrowed from Dave D. Overall, I'm happy with the terrain, but as ever there are area's that need improvement!
For game rules, we were mainly using Flames of War v4 (with a few tweaks to fit the scenario and a more spread out German defence). Nice and easy for the guys to pick up and gives a decent enough approximation of the combat while keeping turns nice and short. Yes, there were a few tweaks to the rules, but I would have had to do this with any rules set.
I also had a system of off table artillery for both the Brits and the Germans. The Brits (who were the players, the Germans were deployed on a sketch map and only revealed when encountered) could activate 'random events' on the table, and collect the tokens to then spend on artillery or reserves.
The Brits were attacking from two directions - directly into the village, and up the map cross country. Both faced different challenges, and had various options. Angus led the company attacking into the village, along with Ian and Martin (
who's account of the game can be found here). Pete, who hadn't played in these games before, led Roy and John in the across country attack. Both commanders decided that it would be a good idea to attack before dawn, so as to get 3 turns of darkness to close with the German defences. After some discussion, it was decided not to use a preparatory bombardment, and make use of stealth.
Everyone had a depleted infantry platoon (only 5 infantry teams, HQ, PIAT and Mortar) to account for the previous days casualties, along with a troop of only 3 Sherman's (only some of the Sherman troops had Firefly's, again taking into account the previous games casualties). Angus also had a Vickers MMG platoon and Pioneers, while Pete had a 3" Mortar platoon.
I'm afraid, what with running the game for everyone, I totally forgot about pictures for the first few turns!
 |
| The whole table, with British forces already advancing. Note that the table is more or less empty otherwise - the players have no idea where the German forces are, although at times they were given indications of areas of engine noise, or the general idea of where Mortar fire might be originating from. |
 |
| Angus' and his comrades move into the village, encountering a deep ditch (supposed to encourage the use of engineering assets, but they never asked for any!). Ian lost a platoon of infantry during this advance to fire from the houses while he was in the open. Martin got his platoon into the village, took out some 5cm A/T guns, but didn't get too aggressive. Angus fought a prolonged firefight with German troops in the stand alone dark grey building - using the Vickers as well. He took casualties and was pinned by heavy MG fire and artillery/mortar strikes. |
 |
| Pete's infantry closing on the hedge line. Some good night visibility rolls spotted a lot of the German units holding the line. However, this image probably shows the limits of Pete's infantry advance. This platoon stopped and failed to dig in, was pinned and then spent the whole game pinned. Roy, on his right, got random events which meant his troops were slightly drunk, which improved their HtH ability (too much Calvados). He skillfully used a ridge in the field to get close, and assaulted his way up the table. I think he killed more German units that anyone else with this one platoon. John was on the far right, and used his infantry and tanks carefully to get to the village and support Ian. |
 |
| German guns, deployed as per Dave's instructions! Carefully hidden behind the closest hedge. If the Brits had attacked in the daylight with their Shermans, things could have been very messy. |
 |
| 88's and 2cm AA... |
 |
| Infantry with MG42 in the barn, backed up by 2 Pak40's. |
The game moved pretty quickly, with the hedge line being breached and Pete's company's troops moving forward (with his own infantry cowering in the rear). I think Pete used about 1/4 of the counters on the table to try and kill the single 88 on this hedge line with artillery... Including multiple 25 pdr strikes, 5.5" gunfire and a strike by Typhoons!
Meanwhile, Roy took out the infantry, Mg42, Pak and another 88.... and got another 'Calvados stash' result, meaning he was hitting on 2+ and suffering a -2 penalty to shooting due to his troops inebriation. I think his Lieutenant might be in for a DSO or MC he can't remember earning.
 |
| Meanwhile... it looks quiet... too quiet... |
 |
| German defenders are discovered, with a 5cm A/T gun and 2cm AA gun covering the road. The building on the left was also occupied by grenadiers with an attached HMG. |
 |
| Angus keeps moving forward! |
 |
| The house of woe. Eventually, it would fall to the Brits - only for a 9th SS platoon to assault out of the nearby houses while MG42 fire killed the occupants (5 failed saves and I rolled 5 '6's' for firepower...). Much was the Brits disgust at losing the building they had fought so hard for. As a result, it got special treatment from some reinforcement 'Crocodile' flame throwers. |
 |
| Roy's assault about to go in, while John has penetrated the defences and found another 88. |
The difficulties in town fighting were soon apparent, with the Germans in buildings proving very hard to shift by normal rifle fire. German arty and mortar fire was also effective, killing Brits as they tried to move up to assault and pinning the units down - momentum was starting to be lost in the village.
 |
| Another view of Roy's platoon, about to charge the barn! - and the Shermans arrive, only for one of them to get knocked out by a Pak40. The vulnerability of the Shermans to the Pak40's seemed to come as a bit of a surprise... |
 |
| Pete's troops move backwards, away from the German 2cm AA and 88, while the Mortars arrive and deploy. |
 |
| 88's view of the Shermans |
 |
| Roys attack goes in! And finds another cache of Calvados... Roy takes out the infantry and Pak40 - the 88 crew leg it and abandon the gun (my call as umpire, they could do nothing to stop rampaging infantry). |
 |
| The firefight continues, although Shermans had now arrived. |
Once the armour game on, the Brits started to move forward a bit - I think Roy's determined assaults gave a clue as to the best way of shifting dug in Germans!
 |
| Unfortunately, allied armour wasn't the only armour in the area! |
 |
| The StuG's had spent a lot of the game bailed, due to allied random events which specified the closest armoured vehicle became bailed - when they had no armour on the table! Trouble starting those engines, I suppose! |
 |
| Typhoon attack on the 88's - spot the yellow 'smoke' with the platoons at the back! I was using skill checks for simple things, like the Typhoons identifying the target, and the Brits popping smoke to avoid being hit themselves. |
 |
| There were, at one point, a platoon of Grenadiers with an attached MG42, a platoon of 9th SS Panzergrenadiers with attached MG42 and a (depleted) grenadier platoon... with MG42... in this line of houses. As the defence here seemed stable, one platoon of grenadiers moved back through town to try and counter the British penetrations ealswhere. Using buildings for cover, the Brits lost track of them and believed them to be a new unit when they appeared again. As the units were in buildings and 'unspotted' other than through their firing, I didn't need to deploy them to the table until they became visible. Similarly, troops in the church never became visible, although they were firing out. |
 |
| German AA in the churchyard - who would later shoot down a Typhoon. The church contained a platoon of SS with MG42, a single MG42 which had fallen back from the grey building and joined them and an OP team in the church tower (who was never shot at until artillery hit the church). It must be one of the top 10 rules in Normandy - take out the church tower! |
 |
| British armour advances - encountering a Pak40 behind the buildings on the right, which bailed the Firefly. Ian's tank on the road between the buildings (far side of the town square) forgot there were Germans in the building to it's left, was bailed by a panzerfaust then destroyed by an assault by the infantry. Tanks in built up area's don't work well! |
By this point in the game, the Brits well and truly had momentum. Infantry and tanks were getting into the town, and the cross country German defences had collapsed (mainly due to Roy's platoon assaulting it!).
 |
| Roy and John moving up to the 2nd hedge line. The Pak40 duel with the firefly can be seen here - the Brits had no idea what was in the field till the tanks parked alongside it - I had British recce as reinforcements, but none was requested - although Pete got some Stuarts while trying to get armour for his side. The Pak40 kept failing it's firepower check, so the tank was only bailed. |
 |
| The Croc's also arrived. |
 |
| German defences re-organising. Both StuG's died without achieving much. I did have Panzer IV's to bring on at a random point, but kept forgetting to roll for their arrival. Too caught up in the game! |
 |
| Brit armour moves in to hammer the church - there is actually a German Panzershrek team in the burnt out building on the right, but the game ended before they could fire. I think the Brits would have lost more tanks in another turn or two - there were German infantry AT assets still active in the town, and the Brit infantry wasn't really moving up with the tanks. |
 |
| The Vickers occupied the grey building - which must have been swiss cheese by this point! |
 |
| British infantry penetrates the orchard from the country side of the board. The Pak40 is taken out in an assault by Roy and John's troops, while Roy's troops also send the fusilier platoon running. |
Then it was time to pack up. I think we can say that the Brits managed to secure the centre of the village with their armour - though I think they might have had a sticky time until the infantry got forward. Martin had infantry and Pioneers in the town, and Ian had infantry - but they were happy to let the tanks do the heavy lifting I think!
 |
| German Mortars had been dug in behind the church, but as their presence was never going to make a huge difference, I didn't deploy them in sight. If the game had played on, I would have! |
 |
| A Typhoon strike killed a retreating Pak40, but one of the Typhoons was brought down by the AA in the churchyard. |
 |
| Roy's infantry got a 'lost' event, and went in the wrong direction... almost like they were drunk... I'm going to rename that event as 'contradictory/garbled orders' I think. |
 |
| Pete's OC and OP teams, trying to catch up! |
 |
| The whole board, at the end! |
 |
| Pretty pleased with the town, but I think it would have looked better with more setup time and a bit more greenery. Outbuildings and maybe some more houses are still on the cards... |
So that's it!
The players have done better than historically was achieved, but I think the defences historically were far tougher, with the recce battalion of 9th SS being committed to the fight, as well as armoured assets from 9th SS which included Panthers, StuG and Panzer IV's. German artillery and mortar fire was also more prevalent than I think I used. I think this was a tougher game for the players this time, but to their credit they used very few reinforcements and worked as a team. The empty battlefield really adds something!
Everyone seemed to enjoy the game, and as players they were great fun to umpire for. Fingers crossed we can get something like this going again, although whether we continue with Operation Pomegranate or try something else, I don't know! Certainly, as a proof of concept for how I'd like to play historical based WW2 games in the future it worked well.
Thanks to Angus, Pete, John, Martin, Ian and Roy. Thanks also to Dave D for use of the matt! For more pictures, check out
Martin's blog post!


Great write up. I was sorry to have missed it,
ReplyDeleteNext time Dave - thanks for the mat tho!
Deletewas a brilliant game, thanks for the effort
ReplyDeleteA pleasure Martin! Another learning experience for all involved I think!
DeleteOutstanding and very inspiring! FOW really shines here as a historical rules set and V4 has only helped in that regard IMHO. Nicely done sir!
ReplyDeleteThanks Steven, I would agree - no major issues with the rules at all, and the minor ones were issues I would have had with any rules in such a narrative context!
DeleteIt is a superb game table with lots of scenery that recreates very well the Normandy countryside. Super game part and very nice report!
ReplyDeleteThanks Stefan - I'm really keep to try and get that 'Normandy' look and feel. There is always more to do!
DeleteGreat looking game James 😀
ReplyDeleteCheers!
Deleteincredible gaming table and from the text, I gather you use some 'special' gaming effects (yellow smoke / nearest armour baled out til ....?) I'd be interested to know more of the concept and scenarios. We currently are also running up to a series of linked scenarios for Op 'Blue Coat' (albeit set up in Dutch :-( ). I'd be very interested in an exchange of Material.
ReplyDeleteThanks Sybren!
DeleteBrilliant blog post, James. And thanks again for putting on the game - you did a great job running it! Yep, I'd be very happy to play FoW again. I've now got hold of the V.4 rules for this period and the Atlantik Wall book, so look out for some cool looking, suspect morale Luftwaffe ground troops running away from Caen.
ReplyDeleteYour very welcome Roy - glad you've been inspired! I've enough tanks to do some sort of Goodwood game... I think the Luftwaffe ground troops took part at that point... briefly!
Delete"Briefly," as in they were decimated before and during! lol
Delete16. LwFD - or at least parts of the division - were present for Operation Charnwood and Operation Goodwood, from what I've discovered from brief cross referencing from the Internet.
A lovely looking game, but best of all the narrative of the game read like the histories of the conflict.. well done!
ReplyDeleteThat's a fantastic compliment! Thanks!
DeleteHi James - I got sent here by Roy and just wanted to let you know I thought this was quite an excellent report of a very interesting game scenario.
ReplyDeleteYour report made sense all the way through and I could follow what was happening from the pictures and your dialogue. Your terrain worked well even though I'm not a fan of mdf it all looks believable.
I've not seen many games using Flames of War but what I have seen are usually ludicrous demonstrations of lines of tanks charging like Napoleonic Cavalry, infantry with no role to play looking like Cinderella at the ball with no dress and players with no sense that if you are out in the open - you die.
I'm probably being a bit over critical but your game was a refreshing change.
Cheers
John
Stunning piece which only reflects your approach to gaming this period. Loved the direct historical connection I think you matched the aerial photo to the terrain board very well.
ReplyDelete