Saturday, 3 December 2022

Battleground 2022

Hi folks,

A little late, given that the show was a week ago, but I thought I'd share some of the pics I took. These are mainly of DaveD's Vietnam game (more images can be found here). I did start going round other tables, but got distracted. 

We had a good show all in, nice to meet up with people and have a chat. More of an interesting mix of traders, but really still a struggle to find anything specific. I think a common discussion we have is that a lot of stalls seems to be re-sellers that are selling more or less the same stuff. 

Still, I managed to spend my limited funds on some Sci-Fi merc figures. These are a little smaller than my Necromunda figures, but I'm hoping they will do for civilians, etc. 

For the game, Dave had brought his 28mm Vietnam collection and was using a mish mash of rules he has been working on. The system is simple and quick, and uses a card activation system similar to Sands of Sudan. Effectively, the NVA/VC forces are there more to challenge and obstruct the players (who play the US). The game runs on a turn clock, and the US are time limited to achieve objectives while minimising casualties. So not so much a straight up 'versus' wargame. 

The basic premise was that a US Huey had been shot down, and the crew/passengers were in need of retrieval. A NVA snatch team had grabbed an injured officer and hauled him off to the village, while US and VC forces rushed to secure the chopper and evacuate the crew. Unfortunately, during the game the fist Huey to attempt a rescue was hit by an RPG and the US problems doubled.

Late game photo of US air support in action

One of Dave's Huey's on it's custom flight stand


Huey overflight of the village, looking for the NVA snatch team

Dave's impressive 28mm Chinook

Cobra in action

A Cobra and Chinook make an approach to provide support

US air support targeting NVA mortar positions in the village. 

The 3rd rescue chopper lands to evacuate the crew of the first...

US forces, with M113s advance on the village. 

A quick wonder round some of the other tables:

An impressive 20mm Sword beach game. I got distracted here talking to the owner about our own Normandy gaming, and afterwards forgot to get pics of others tables!


Cool flags...

An impressive built up game, with a castle!

Pony Wars - a game I'd played recently at the club


Tuesday, 29 November 2022

Necromunda Terrain project

Hi folks,

I had been trying to get into the habit of updating the blog regularly, but it hasn't happened. I think more frequent updates next year might be a small resolution, if only so I can track my own progress. 

Since the completion of my last Team Yankee Dutch unit, model painting has fallen by the wayside a bit. Instead, I was prompted by Amy's demand that I get a box of wargaming stuff out of the wee man's bedroom to paint some of the 28mm Necromunda terrain I'd bought in 2018. 

So far, this is where I'm at with it:


This turned into a bit of an epic project. The wall sections I'd purchased from 'Just lasered' were laser cut foam, designed to sit on the carboard tile sections of the more 2d game (as Necromunda was back then). 

However, Necromunda has evolved into a more 3d game and I wanted to replicate that. This meant adding walkways to the tops of the walls, getting more levels and finding a way to paint foam!

Thankfully, I discovered after a fair bit of trial and error that a coat of grey surface primer would work on the foam, and give a concrete appearance. Along with some black and brown washes and some green grey to more match the colours of the floor tiles, I found a quick solution. 


The foam walls came with greyboard details to be added onto them. These details I treated to a quick dapple of a mahogany and gunmetal paint, then a liberal coat of brown wash. These were then glued onto the foam.  


Using some MDF kit's I'd gotten a while back, I found parts to use as floor tiles for the tops of the walls, along with some 40x40mm bases. I also painted up the plastic terrain using the same simple 'mahogany brown' and 'gunmetal' scheme. Stairs from the MDF kits were a good height for the wall sections, and thankfully I've a lot of them as they work well and also provide cover, etc. 

I also added some plastic pipe sections I'd picked up from a cheap GW magazine. 


I picked up an industrial mat from DaveD, which matches in pretty well. Some home made bridges using MDF bases and purchased bridges from Pendraken, as well as some ladders from their Red Vector range, give a bit more of the old Necro feelings. 

I've also painted some of the doors from Just Lasered and picked up some 4ground ones cheap. However, I'm not happy with either solution so may buy some GW plastic ones in the future. 

I've a load of industrial barrels to paint, and some ammo/industrial crates for scatter terrain, along with a few other sci-fi bits. I've some more pipe sections as well, which have all been built to be placed against walls and provide more cover.


As part of the AHPC this year, I'm planning to get a couple of gangs painted, so have been building those models as well. My thinking is that if I have the terrain done, I'll be more motivated to paint figures!

I've tried to keep the terrain as stackable as possible, with things working well up to three levels. It becomes a mix of 'Sector Mortalis' and 'Sector Mechanicus' at that point I think. I do have some larger MDF bits to do, stacked cargo container dwellings, etc. I'm fairly happy with how it all looks at the moment, although I accept it's a bit basic!

My long term plan with this is to run a long, slow burn narrative style campaign with the figures I get painted. 

Saturday, 8 October 2022

Finished: 15mm Team Yankee Dutch M106

Hi folks,

The third unit 'finished' from my recent batch of Team Yankee models. These take the form of a unit of three Battlefront 15mm plastic M106 self propelled heavy mortars. 

I believe that the Dutch only used the M106 armed with a 107mm heavy mortar as part of their recce units, whereas in Team Yankee the option exists to also use 120mm armed version instead of the towed 120mm mortars used by infantry formations. The justification being that as war approached the Dutch may have found a way to mount their 120mm mortars in these vehicles (or purchased the up-gunned version). But really Battlefront are just avoiding towed artillery in Team Yankee. 

While I have painted the mortars for this unit (the 107mm version), I've no issues with doing a 'counts as' if required. I do still have gun crew to paint, and the mortars to add into the vehicles. But the vehicles are tabletop ready at the moment, so I'm counting them as done. 


The Battlefront plastic M113 kit is pretty nice to build and paint. A cool and iconic looking vehicle that goes together nice and easily. I've another three of these in the APC configuration to paint for the recce troops transport. 

Thursday, 6 October 2022

Finished: 15mm Team Yankee Dutch YPR-765 PRATs

Hi folks,

Another small unit (soon to be expanded) for my Dutch Team Yankee force. This time a variant of the YPR-765 hull mounting an Emerson TUA (TOW Under Armor turret). This vehicle filled the same role in Dutch forces as the M901 did in the US Army. PRAT stands for Pantser-Rups-Anti Tank (armoured tracked anti tank, I think). 

These models are actually resin 3d prints from Butlers Printed Models. I've included some comparison pictures with the Battlefront models mounting the TOW turret later in the post. I have another two of these models in the painting queue. 

The two BPM models:

While detail is lacking on the 3d prints in comparison to the Battlefront kits (especially the tracks and turret vision blocks, etc) I did find that once painted you would be hard pressed to spot any real difference. Especially on the table at gaming distances. 

However - and this is a big however - I found that after paying postage and an extra surcharge for having these four models printed in resin, I'd have paid almost the same for a box of five Battlefront minis. Which is disappointing when the quality is not the same. 

Butlers Printed Models: £6.36 x 4 = £25.44, Postage = £5 (actually £10 for me, as I bought two batches of two), Total: £30.44 for four, or £36.80 for five. 

Battlefront box of 5 = ~£35 (including postage) for five higher quality minis. 

I don't feel that the lack of assembly makes up for the lack of details of the 3d printed model enough to justify the similarity in price. Certainly something to consider in the future, and proof that 3d printed is not necessarily cheaper. In their favour has been the helpfulness, quick response times and friendliness of BPM. 


Some comparisons with a Battlefront model mounting the Battlefront plastic TOW turret. 

BPM model at the front. 

BPM model at the front, notice it isn't as tall as the BF model behind. Both are on the same bases. 

Side by side, with the BPM model on the left. As you can see, detail is less but not bad at tabletop distances. 


Tuesday, 4 October 2022

Finished: 15mm Team Yankee Dutch YPR-765s

Hi folks,

Another belated update on the progress of my 15mm Team Yankee Dutch project. 

There is a larger discussion here about painting progress, timing and batch sizes. I like to keep things rolling painting wise and generally expect to complete one platoon every two weeks. But currently I'm painting in larger batches (the last bunch being 10 models, or 3 different units), and this delay irks me and makes me feel like I'm not being productive. It certainly means I post less on blogger and other social media about my progress. 

Anyway, while I ponder my painting ambition and goals moving forward, here are another five Dutch YPR-765 vehicles. These are the standard IFVs for my armoured infantry. These are Battlefront metal and resin 15mm kits. 


I have managed to find enough spare M113 hatches to construct some of the .50cal armed turrets used on these vehicles as well. My hope is to have some more lightly armed options to represent reservist/2nd line troops. These alternative turrets are also magnetised and awaiting painting. 


Four of these vehicles will form one platoons transport, while the fifth will be a spare. 

As per my previous attempt at these, I enjoyed adding some of the more modern touches, such as the rear brake and indicator lights. Aerials are my usual fishing line solution. 


Wednesday, 10 August 2022

Finished: 15mm Team Yankee Dutch Leopards

Hi folks,

It's been a long, hot, summer here in the north of England. That, and a number of other factors which have included repeated illness, a major birthday and a general lack of painting mojo has led to a lack of progress. 

I did take some time out to do some gaming, which I've still to post about. This included a decent sized ACW game at Pendraken's new show/gaming venue, along with attending their open day. 

However, this last week I've knuckled under and managed to get my Leopard 1 contingent completed. 


These nine tanks will provide a HQ and two platoons of four, or else three units of three. 

They are Battlefront plastics, and were relatively easy to put together. I did have issues adding the bazooka skirts to them, which I eventually had to resolve by trimming some of the track detail around the front sprocket. I could see no other way to assemble these without massive gaps and I'm not sure if I was missing something obvious. 

I've added Battlefront NATO tank commanders to three of them, added the appropriate machine gun to the turrets and my usual fishing line aerials. Decals on these are basic, as the Dutch don't seem to add many markings to their tanks. 


These are not quite the correct model for Dutch Leopards, as the Dutch added stowage bins along the side of the hull (where the tools are on this model). This in turn impacted on the placement of the 'NL' decal. However, I'm happy enough with them and have promised myself I'm not going crazy with this collection as I have my WW2 stuff. 

Basing consists of 70mm by 45mm MDF, with the usual magnetic material underneath. I added two different tones of grass tufts, but otherwise my usual shade of green static grass. 

Paint came from the same AK Interactive 'US Olive Drab' special set. I've now tried the '3g' primer and paints form AK Interactive and I am impressed. The primer especially is great. Needs thinking but gives a really nice durable coat. 


I was pleased that despite all the trial and error that went into the earlier APCs, the Leopards match in quite nicely. I could perhaps go a bit heavier on the lighter dust weathering, but that's an easy fix. 

Added to the queue next, some more APCs! However, I did pick up a set of the Army Painter Speedpaints for my birthday. This was mainly as a way to paint my sci-fi models faster, and I'm currently using them to paint up my last units of knights for the Joshua Project. This is still a thing, and progress will be made on selling on the donated models for charity later this year (hopefully). 


Tuesday, 21 June 2022

Finished: 15mm Team Yankee Dutch Mechanised Infantry platoon

Hi folks,

Another long gap between blog posts, mainly brought to you by a distinct lack of painting mojo on my behalf. I normally seem to suffer a bit of a slump post AHPC, but this year I struggled to shake the doldrums and was distracted by computer games and TV shows. 

I did manage to assemble all of the Leopard 1 models for the TY dutch project... 

Aside from building some tanks, I had slowly been chipping away at the infantry for my previously completed IFVs. These models are 15mm Battlefront metal casts, and were nice and easy to paint. No camo, limited range of colours and some nice poses. 

The pack contains enough models to also build the formation command team, and with two radio operators I was able to easily mark out which of the infantry teams would be the HQ. 

In total there are four GPMG/LAW teams, three Carl Gustav teams and two Dragon ATGW teams. Then the formation commander on the small base. 


They look the part with their transports. 

I've not gone for any flower tufts on the bases, mainly to separate these out from my WW2 stuff, but also as my perception of a cold war landscape is one with a lot less 'wildness' to it. I do have two shades of grass tufts, just for some texture and variation, although they don't show up well on my (poor) photos. 

I'm unsure what's on the painting table next - possibly another vehicle unit just to make sure I can replicate the same look as the IFVs. 

Saturday, 7 May 2022

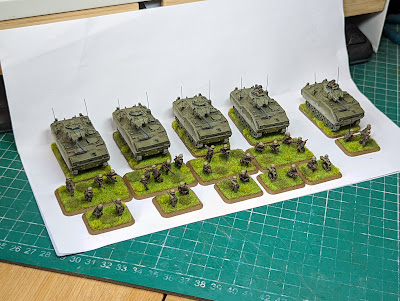
Finished: 15mm Dutch YPR-765 platoon

Hi folks.

Changing things up a bit from my 15mm WWII stuff, I decided to try some 15mm WWIII stuff instead. 

My gaming buddy Dave D had picked up some 15mm 'moderns', and despite years of very determinedly steering clear of 15mm Team Yankee, I was easily dragged in. I decided to go with a Dutch force - although our plan is to also use our firgures to play Seven Days to the Rhine and 'Centag' (Battlegroup's rule set) when it is released. All these systems use similar basing for infantry and are 1:1 scale. 

Part of the reasoning was also that we have a lot of 15mm scenery between us which would convert nicely over to a more modern setting - with a few additions. 

To kick things off, I thought I'd make a start on a mechanised infantry platoon and it's transports. The infantry are started but still on the paint desk, while the vehicles were an easier job:


With these 15mm Battlefrong resin and metal minis I wanted to try a different painting style, just to expand my abilities a little. This was 'kind of' a success, but I failed to achied what I was aiming for. 

My plan had been to use an Olive Drab modulation set (from AK) and a stipple/drybrush technique using Artis Opus Series D brushes to get a more modulated effect without having to use an airbrush. Unfortunately, I need more practice and/or the technique is harder to use on models smaller than 28mm. 

What I ended up with was a stippling application that was pretty fast, along with a much more focused drybrush to hit high points. I actually found I didn't need to use a wash, building up from a black basecoat. I had the basics done in one evening. Unfortunately I then tried a couple of things/colours that didn't work and saw me having to return to the 'Olive Drab' base green, before just sticking with that mixed with the highlight colour for edges, etc. 


Having said that, as much as time was lost due to my faffing and trying unsuccessfully to be more arty, these were a hell of a lot simpler to paint than the half-tracks!

Aerials were added in my usual style (although I went with black grey paint, rather than black). Two commanders have been added as one vehicle will be the company commanders transport. Decals have been added, and with the Dutch using few tactical markings this was pretty straightforward. I then added a good amount of weathering dust to the tracks and lower hull, just to add some interest. I also painted the periscopes blue, and added colour to the lights as per some reference pics - just to give a bit more of a modern feel over my usually plain WW2 models. 

I've decided with my Team Yankee project I'm not going to go into the rabbit hole I normally do with my WW2 stuff. I'm accepting the fluff and setting from the Team Yankee faction books and just doing what I can to get a useable force painted. As such, I've not attributed these models to any particular unit. 
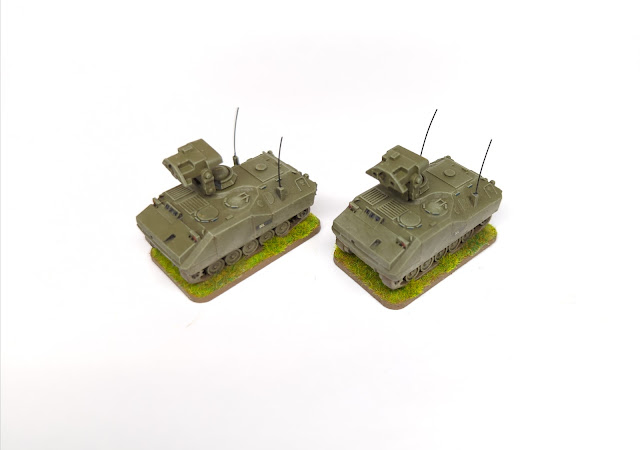
I have drilled out and magnetised the turrets, and have built the TOW launcher upgrades which came with these kits (which are also magnetised). My plan is to have those as a little extra option should I need them in the future. 

For basing, I avoided my usual flowers and just stuck to some green grass tufts for variety. I had planned to use a darker static grass, but was unhappy with how similar it was to the vehicles. I used Tan Earth (or US Field Drab???) for the base edges as well, so they are lighter than my usual WW2 bits. 


Having finished the unit, I was a little annoyed that I'd tried a different painting technique and paints, and ended up with my usual WW2 British paint scheme...


Thankfully, putting them side by side shows they are different (and demonstrates the different pictures you get with different lighting)!

Tuesday, 19 April 2022

Finished: 15mm Wespe and Hummel Gun Sections

Hi folks,

The last two vehicle units on my project sheet for my German Panzergrenadiers have been completed. After a week or so of sitting on my desk awaiting tufts, I've managed to motivate myself!

These two units do not form part of the Panzergrenadier force per say, but would be divisional support assets. 

First up, the Wespes:


My lack of motivation for these models meant I've not added any sort of foliage to them - something I'll probably fix when I come to paint and add crews. It was a bit of a cop out, but it's a time consuming step and I really just wanted to finish these off and start painting something else. 

From my research, these vehicles had no hull numbers, and few tactical markings other than the German cross. I've added a divisional badge sign on the rear (no easy place to put on on the front). Camo was done roughly using the same colours as the half-tracks and stippled to be a bit softer. 

I'll have two crew members to paint and add to these at a later date. 

Next the Hummels:


These are much bigger models than the Wespes, being very chonky (unsurprisingly, the same footprint as a Panzer IV, given they use the same hull). I've crew still to add to these, but as per above these will be done later. Also, no other tactical markings I could see historically in the period so pretty simple decal wise. 

These models also need foliage adding, which I'll do when I return to add the crew. I did make an attempt to paint the striped sticks - having first checked these were supposed to be striped. I'm still not convinced that there were not barrel cleaning poles. 

All six models are 15mm scale metal and resin kits from Battlefront. For the Wespes, this now gives me a unit of six. I doubt the Hummels will get much table time, but they were part of the divisional artillery for 12th SS as far as I can see. Also, something to worry players with during scenario games!

With these units done and off my table, I'm now moving on to painting something slightly more modern! 15mm Team Yankee Dutch!