I had meant to post an update at the weekend, but time got away from me. Last week and into this week I've been working on my two Tigers and three StuGs which will finish off my German Heer list (for now, and with still the minefields and bunkers to sort out...)
So the Tigers came from Lee, and were in pretty good shape:
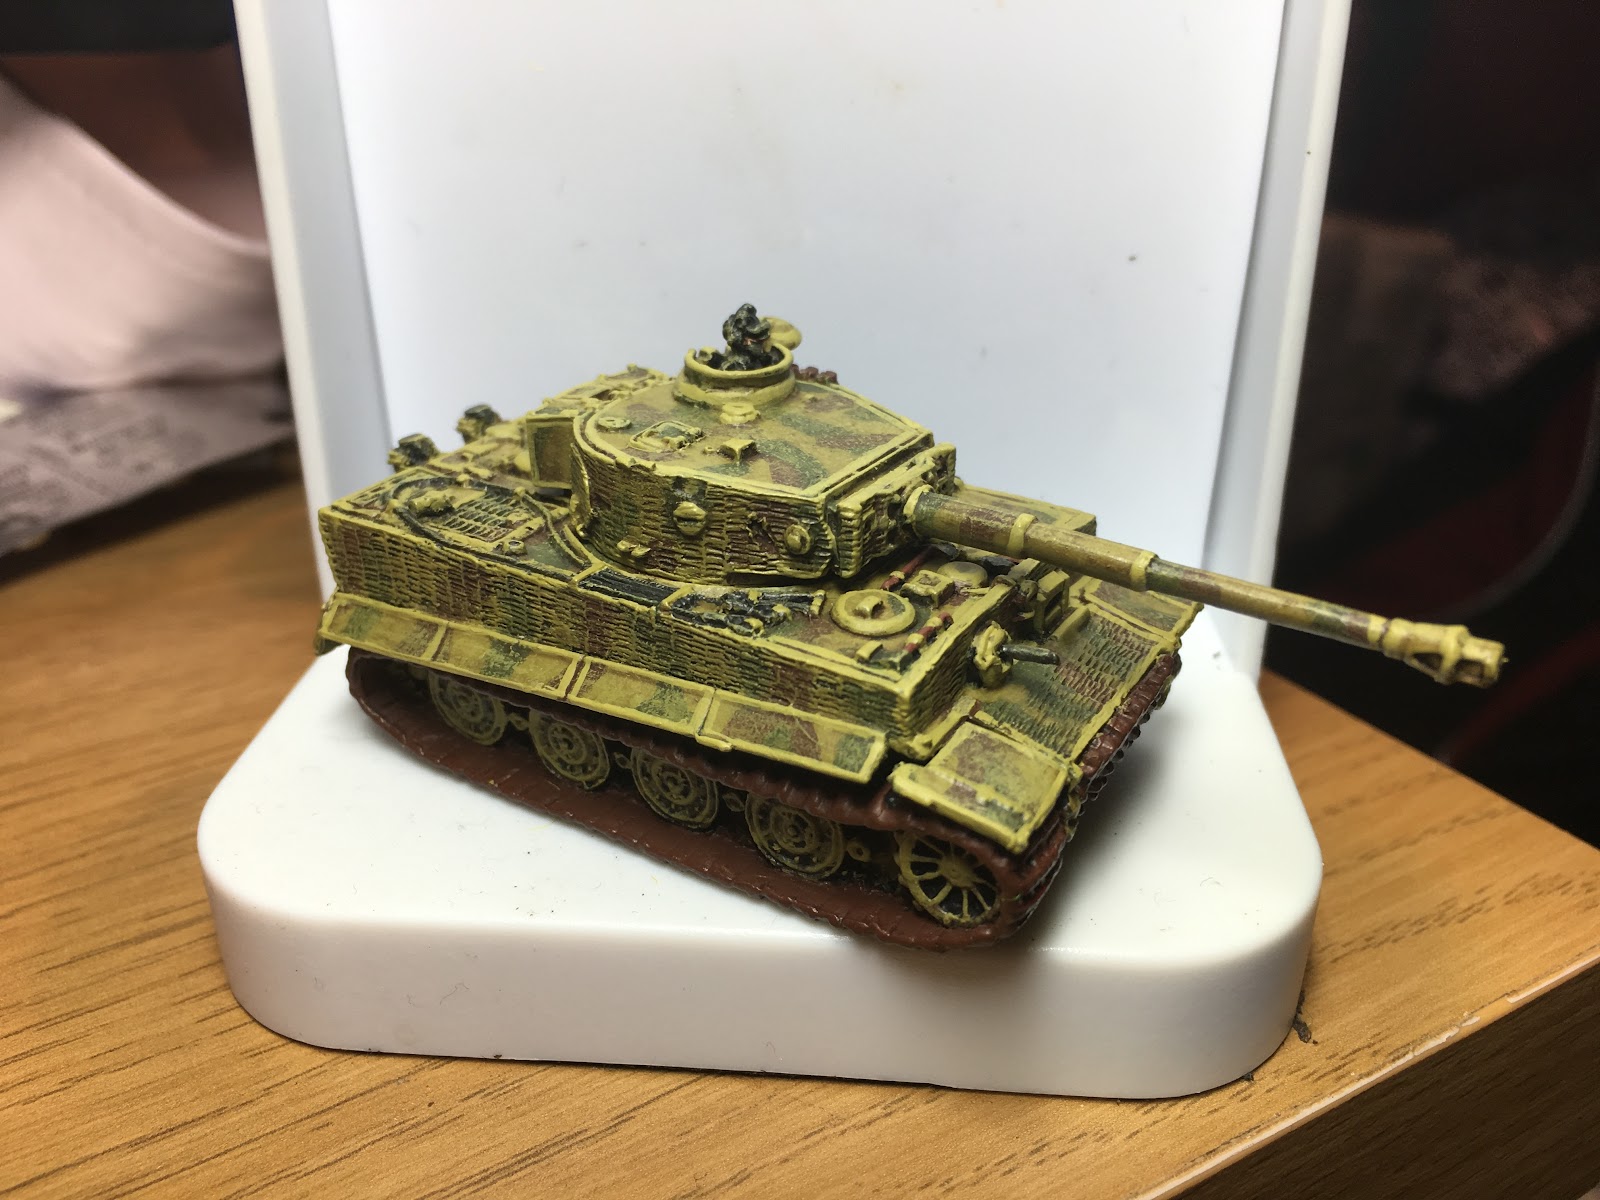
But I've discovered I am totally unable to just use models someone else has painted (sorry Lee!) and needed to do my own thing with them. Without touching the basecoat or camo, I ended up with this:
Mainly through a couple of drybrushes, new track colours, edge highlighting, etc. These pictures were taken mid week last week, and as of now the tanks are awaiting the decals to make them 101. Heavy Tank Battalion vehicles. Still bearing the gloss coat, so a little shiny:
I removed one of the turret hatches on one of the tanks and replaced with a closed hatch I had spare from somewhere - my standard setup is for only the command unit to have a figure out the hatch. Still weathering to do once the decals are on (red turret numbers, the unit markings and tactical markings) and the base is still in progress.
I've also been working on my StuGs, which are from a different unit so bear a different camo pattern (something I am going to try and replicate with my various German vehicles - the Tigers should all be painted similarly, etc).
Just the edge highlights done on these guys so far, still a lot of other highlights to do. Not looking too bad at the moment tho (this method of painting looks better at distance!!!).
So that's it - hopefully the StuGs will be ready this week - I'm not so bothered about decals for these guys as I can find scant info about the unit. Plus with it being a rare Panzerjager unit of a standard Heer high numbered infantry Division.... no one will make decals anyway!
With the end of the June challenge and the huge number of figures I finished over the two months, I took my foot off the pedal painting wise. However I have remained focused on getting this German list built before moving on to something else (probably a veritable horde of Shermans and Cromwells). Unfortunately I still had infantry figures to paint, but thankfully not too many of them. To round out the list I had a unit of 2 x 88mm AT/AA guns, 3 x Nebelwerfers and a small platoon of infantry (an infantry recce unit). I've still got a few bits to do, but at this point it's all vehicles.
So first up, the 88's. Going by the list in the Atlantic Wall book, these guns should probably be Luftwaffe guns. However, as the 89. Infanterie Division had two of it's artillery units equipped with 88's, I've painted the crew as Heer.
Each gun consists of the gun itself, an optional loader team (which increases the guns RoF) and the wheels for the guns. I painted the whole lot for both guns, plus scrounged up a command team. I worried for a bit about the paint scheme for these guns - but I couldn't find any references for possible camo on 88's in Normandy. I finally found some pictures of 88mm wheel units in a quarry during or after the Totalize battle, and there was no sign of camo on them - so i went with straight Middletone.
Next up the Nebelwerfers! Now given that this list was as much a focus on iconic German weapons of Normandy as it was on 89. Infanterie Division, I felt I just had to include these. The division itself didn't have any of these weapons on it's own strength, but was backed up by a Nebelwerfer Brigade which was in the area.
This unit is 3 x Nebelwerfers with command and spotter team. I still have to paint the Kubelwagon for the spotter unit, but other than that this unit is done for now. I might increase it to full strength with another 3 rocket launchers in the future.
Lastly we have the infantry Recce platoon. This is a small rifle only unit with no machine guns - only the command team is anything different being a SMG Panzerfaust team. These are all Battlefront plastics - nice models once painted but still some significant areas on each one which lack detail. Too much detail on the sides and rear of the models just blends in without any definition. Metal models and much better than this. These pictures have come out a little darker for some reason:
Next up on the painting table are the 3 StuGs and 2 Tigers. The Tigers from Lee are painted and just need tidied up to fit in (highlights, radio arials, bases, etc). the StuGs I'm a bit nervous about as they will be my fist attempt at painting German armour from scratch...
One of the things that has been on the plans for a while (other than a guide to my basing style! That's been ticked off the list!) has been a plan to both detail some of what I know about the Totalise/Totalize battle and to look at FoW specific armies and scenarios linked to these tumultuous few days in August 1944. I've made a start in the past, with posts such as this, where I laid out the Allied OOB during the Battle. I'm planning another post detailing the German side some time soon*, although I did start by researching 89. Infanterie Division earlier this year. I've also recently done a video of my British and German collections so far.
*Soon may not be soon.
So, what is Totalise, and why the obsession?
The 'what' might be easier to look at first. The British and Commonwealth campaign in Normandy contains a lot of well known battles (also called operations). These battles formed a large part of the learning experience of the 21st Army Group. Many of these battles, despite being successful in achieving limited gains while forcing the Germans to keep substantial forces facing the British and Commonwealth forces, are viewed as tactical failures - often small advances being made at heavy cost.
This pressure and the scale of these massive set piece attacks meant that at the western end of the bridgehead, the US and Allied forces faced 1½ Panzer divisions compared with 6½ facing the Allied forces on the eastern (British and Canadian) flank. For much of June and July the Germans had also been convinced by a massive Allied deception operation (Operation Fortitude) that further allied landings (led by General Patton) were to be made in the Calais area - behind their current front line. As such, the British and Canadian front was seen as the more important and substantial German forces were tied up defending the Calais area and preventing the Allies from breaking through the German lines in the eastern part of the beach head.
It should be remembered that at this early stage in the fighting in NWE the allied forces - with the exception of a few Divisions and a scattering of veterans and 'old soldiers' throughout units - was mainly a green force, new to combat. They were fighting with equipment which may have been relativity new (Sherman Firefly's were only put into production in January 1944 and by May less than 250 were with units) and having trained in the UK - where space was at a premium and large scale training exercises that allowed for proper cross country training were prohibited. Many of the German units were also green, or at least more recently formed. However the core of the units to be found later in the heavier fighting were eastern front veterans.
Following Operation Overlord on 6th June 1944, operations during June/July consisted of:
To quote Wiki: "Within 48 hours of the end of Operation Goodwood, the 2nd Canadian Infantry Division launched an attack against the "formidable" German defences on Verrières Ridge.They suffered over 1,300 casualties and territorial gains were minimal.
From 25 July to 27 July, another attempt was made to take the ridge as
part of Operation Spring. Poor executionresulted in around 1,500 Canadian casualties.In total, the Battle of Verrières Ridge had claimed upwards of 2,800 Canadian casualties.While the ridge remained in German hands,
the 2nd Canadian Infantry Division had gained a foothold on the ridge
between the village of Verrières to St.Martin-de-Fontenay, which would
allow the troops to assemble free of German observation while they
prepared to launch Totalize)."
Not my image - used without permission
The American Operation Cobra, launched on 25th
of July, broke out of the western flank of the beachhead and the
Americans began launching Armoured spearheads into the interior of
France. Still, however, the Germans maintained their focus on the
eastern end of the beachhead. Hitler had
declared that a counter attack be launched with available Panzer
forces with the aim of cutting off the American advance and reach the
sea (Operation Luttich).
This operation began on 7th of August, 1944, and had lead to most of
the mobile Panzer divisions being moved to the western end of the
beachhead.
Not my image - used without permission
At the same time, a British operation (Operation Bluecoat) had been launched in order to put pressure on the Germans at the join between the British and American lines.
Not my image - used without permission
Planning for Totalize had began on July 30th, when Monty ordered General Simmonds and the II Canadian Corps to begin a new offensive with the objective of reaching Falaise, to start in 10 days time. On the 1st of August, Simmonds produced an appreciation of the tactical situation in which this offensive was to take place: - The attack was to be over open ground, dominated by enemy controlled heights, leaving any allied armour vulnerable to long range anti-tank fire. As such an attack would have to take place when the defenders visibility was restricted and the high ground would have to be secured quickly. - The defences were in two lines, meaning a second 'break in' battle would have to be fought immediately after the first. - Previous attacks in Normandy had failed due to the attacking force moving beyond the range of supporting artillery. As such a proportion of aerial support would have to be held back in order to support the second breakout battle. - Tactical surprise would not be possible in terms of axis of attack or objectives, so would have to be obtained via methods and timing. - It would not be possible to suppress all anti-tank weapons for the entire amount of time required. thus this offensive would have to destroy these assets rather than just suppress them. On 5th of August the plan was ready. The plan itself involved precision night bombing of five targets on the flanks of the attack by the RAF, a rolling barrage by 360 artillery guns, half of the available bomber support being held as support for the second phase and, unusually, two infantry divisions conducting a surprise night break-in attack using infiltration tactics. To ensure the infantry could keep up with the two brigades of supporting Shermans, the troops would have to be transported in troop carrying vehicles.
Situation as of 3/8/44 - note the missing area of front to the south where the American breakthrough was taking place, and the initial bulges in the centre of the map which were the beginings of operation Bluecoat. Totalise would be aimed south from Caen (top right) towards Falaise (middle right). Image is not mine (period map) used without permission.
At the time of this operation being planned, it is important to remember that the enemy force manning the ridge line consisted of 1. SS Panzer Corps (most notably 1. SS Panzer Division 'Leibstandarte SS Adolf Hitler').
On 6th of August Simmonds was informed via army intelligence that the Leibstandarte SS Adolf Hitler was being replaced in the line by the newly arrived 89. Infanterie Division. The initial plan was that the second phase of the attack would see both an Armoured and a Infantry Division pass through in order to continue the attack. Later intelligence convinced the Canadian commander that the SS Panzer Divisions were with drawing to form the second line of defense, rather than being sent west to help the push on Mortain. Expecting the second line of defense to be tougher, Simmonds decided that a further Armoured Division would be required instead of the Infantry Division. This change was made despite the objections of the Armoured Division commanders - who felt that the frontage available to their Divisions was too narrow. This would later be a major issue during the phase 2 attack. Due to a shortage of armoured vehicles (White Scout Cars, Half Tracks, Universal Carriers and GMC Armoured Trucks) for transporting the infantry during the attack, Simmonds 'got permission' to convert surplus M7 Priests, which the Americans had requested the British and Commonwealth forces stop using due to ammo supply issues, into the first fully tracked armoured personnel carriers. A workshop was set up, code named 'Kangeroo', in order to strip out the guns, add armour to the gap and strip out the ammo storage. The vehicles were also given a full service. 76 Vehicles were converted and serviced in only 72 hours by 250 personnel. Some of the metal used was 'salvaged' from beached Landing Craft on the beaches - much to the dismay of the Royal Navy!
The attacking Divisions were given very little time to train with the new equipment or in the new tactics. The initial 'break in' forces would be 2nd Canadian Division supported by the newly created 2nd Canadian Armoured Brigade Group (an ad-hoc mix of 2nd Canadian Armoured Brigade and 4th Canadian Infantry Brigade) and the British 51st Highland Division. The Highlanders would be supported by the British 33rd Armoured Brigade. The stage was set for the night of 7th of August 1944.
No pictures I've afraid, although I have seen some images of the British MBT via the Beasts of War site. Combined with some of the other comments and interviews I've caught, I thought it might be worth a quick article on what's been revealed so far:
- The British MBT shown on the Beasts of War backstage video is a Chieftain. The plastic sprue shown seemed to have two turret options, one of which appeared to have the Stillbrew turret armour.
- There was a comment made that the RAF would not just be getting 'the Tornado with RAF roundels on it'. Which probably means the Harrier or Jaguar (or possibly the Phantom???). Given the Harrier is the more iconic, it's probably that (incidentally, my least favorite period aircraft).
And some suppositions by myself based on what's been seen so far.
- The only real option for the Brit helicopters for the period is the Lynx... although given that the Team Yankee Brits seem to be circa 1970 rather than 1985, that might be up in the air!
- Scorpion and Scimitar Recce vehicles are a possibility. Although again, with the Brits seeming to be getting older kit it could be Fox A/C's.
- I would expect to see the 432 family as the APC's. Hopefully not the older wheeled vehicles.
- Possibly the Abbot rather than the American SP arty that the US and Germans have.
Team Yankee was written to be parallel with "The Third World War" by Gen Sir John Hackett- which was written in 1979 about a conflict in 1985. I've not read this book myself (yet), but I suspect that Battlefront might be basing the British ToE on the contents of that book rather than on what was actually available.
The other comment worth noting was that the Brits are due out 'before the holidays' and that there are currently no plans for what nation to do next.
I spoke about doing a post on this a while ago, but it got put on the back burner and forgotten about. I get a lot of compliments on the basing of my models, and a few of the guys have asked me what I do. There isn't anything really unique about this technique. It's basically applying static grass to the base, then tarting it up with flowers and tufts!
Anyway, a while back I did a little video to show some of what I do, along with some pictures.
1. Prepare the bases (and count you have the correct number!). For the Flames of War bases this is quick - I generally just trim along the bottom edges just to make sure there is no flash or anything here. I also make sure the edge where they base has been attached to the sprue is nice and clean. Normally I would just use a scalpel for this.
As I put acrylic resin on the bases before I put any models on, I also score the surface of the base. I used to do this by scratching a zig zag pattern in 2 different directions on the surface, but recently I came up with a quicker way of doing this. I have a very fine toothed saw (like a hacksaw, but with slightly more raised teeth) and I drag this over the base in 2 directions. Much quicker and safer!
2. Applies to the way I base my mini's. I dislike the idea of putting basing medium near finished minis, as I will get it all over them. As such I put the medium on the bases and then cut holes in it once it's dry. The Acrylic Resin I use just peels off and leaves a nice space for the infantry figures to be glued to the base directly. The trick is getting the resin to a decent depth so that the bases are not pronounced. This method is probably more time consuming that others.
Apply the resin to the surface of the base. I have used a small spoon for this in the past, but recently started using a small 'pallet knife' I got from a painting supplies shop. I believe it's purpose is for mixing oil paints? It allows me to put the resin on the base and then spread it around. At this point I don't worry about the resin being in the wrong place, so long as the base is covered.
3. Once the resin is dry, using a scalpel I cut off the excess. Once this is done, the base should look like this:
4. A apply a coat of by basing colour. For my FoW stuff I use 'Flat Earth' (Vallejo Model Color 143 (70.983))
The trick here is just to put a good dollop of paint directly onto the base, and then use a rubbish but big brush just to make sure the base is covered.
This paint is actually one I go through most of - followed by English Uniform and Russian Uniform (my Infantry and Tank base colours!).
5. Once dry, put a dollop of PVA onto the base, and again use a poor quality brush to cover the top surface. I try to avoid getting any on the beveled edges, but if I do, it's no big deal.
6. Apply the static grass! I use a 'Spring meadow blend' which seems to be a mix of the common 'spring' and 'summer' static grasses. For the 15mm models I think it's a 2mm length grass. I would caution you - if your planning on doing a big army, and want the basing to be the same, take a note of which make and colour you use, else you could end up with variation over the army...
Video of the application process can be found here:
But basically I use a washing up liquid (Dish Soap?) bottle with the stopper removed. this is filled with the grass and given a good shake before use! A funnel of some sort is very useful for getting the static grass into the bottle. You will also need a tub to put the bases in while you squirt them, in order to not be quite so messy. And to be able to retrieve the grass that didn't end up on the base!
7. Once the grass is on, and the whole thing is dried, the base looks like this:
As you can see, the grass is stuck to the sides and is generally a bit scruffy.
What I do next is take a scalpel and carefully cut along the top of the beveled edges. I then use the same scalpel to carefully scrape the glue and grass from the sides of the base. When I'm done, it looks like this:
Better, but still scruffy!
My next step is to take a small pair of scissors - actually nail scissors I picked up for 99p in a super market - oh, the looks A gives me when I turn up with 'random' things for the shopping basket! I use the scissors to do some 15mm landscaping... generally trimming the grass along the top edge and surface. Just to make sure everything is a similar length, etc. It should end up looking like this:
Neater!
8. Touch up the sides of the base with Flat Earth again (I also sometimes do the bases without painting the sides before I apply the grass, to save a little time and paint. However most times I forget!). The end result looks like this:
If you want to, at this stage you could also give the flat earth sections a coat or two of varnish - although I rarely do.
So that's the basic's of how I get the grass on. The rest is simple - for this base I glued a model directly onto the surface by applying superglue to the underside of the tracks and pressing down until it was fixed in place.
The pick what tufts you want to use. I aim to put 8 per base on - 2 each of White and Yellow flowers (Mininatur 726-21 S 'Tufts with Blossom Spring') , short tufts (Mininatur 717-22 S 'Short Tufts Summer') and long tufts (Mininatur 717-22 S 'Long Early Fall'). I apply these by dabbing some superglue on the base where I want it. The tip for this is to glue the model onto the base first!
As to which tufts to use - there are any number of styles of these, and it's just about picking the style that suits your army. Tufts can be used to unify the army, or to mark out different types of bases (use purple flowers on commend bases, or one platoon uses all one colour, etc).
This particular base went on to become:
I also use my little scissors to trim the tufts as well, just to make sure they are neat - 15mm landscaping!
The very last thing I do with my bases is apply some thin 'steel paper' to the underside, so that the bases stick to the magnetic sheeting I use for my storage.
And thats it! Thanks to Bob for getting on my case about this tutorial!