Friday 31 May 2013

Wappinshaw this Saturday!

Following my little outing to Carronade in Falkirk the other week, this weekend I'm heading to Wappinshaw in Glasgow. 

I'm hoping to pick up some bits and bobs - recently I've been thinking about getting some scenery, some Sherman I's and possibly the new Open Fire boxed set - and using the Shermans to do a Canadian or Polish armoured unit. 

This week I've mostly worked on building my M5 half tracks and my 1/144 scale Hawker Typhoon. 


The Tiffie needed a bit of green stuff - I may try some of the liquid stuff just to see how it works. I also need some more acrylic resin to do my bases. And a carry case or magnets. 

I also finished the highlights to my Defrocked Priests and 17 pdrs. Not too sure about them at this stage.... Pics to follow. 

Monday 27 May 2013

Learning to Highlight

This afternoon I've been working on the highlights for my passengers and gun crews.

Highlighting isn't something I've bad much experience with - in my previous 28mm gaming days I mainly used drybrushing as my technique of choice. Of course, on 15mm infantry that's not really an option.

Se many months ago I got my friend Paul (of http://napoleonicsinminiature.blogspot.co.uk/ fame) to sit and show me what I should be doing to paint an actual highlight. It always seemed like something of a mystic art to me, something I could never quite get my head around.

My first few attempts, after applying AP Quickshade, saw me go back to the original colour (normally the Vallejo English Uniform 921) and almost repaint the model. I rapidly realised this wasn't what I should be doing - it looked crap and was a waste of time.

After that I learnt to be more sparing with the highlight, getting through the models a lot quicker and not getting pulled into the trap of basically repainting them. 

Recently I realised that with the scale of the minis and the distance you view them at on the tabletop allows for the highlights to be a bit bolder. Previously I had felt that the infantry looked a bit dark. This then led me towards using shades that are perhaps a bit lighter than I would have considered before. While the minis look a little odd close up, from tabletop distances they look good.

Base coat + Dark Tone Quickshade

English Uniform (921) 66/33 with Khaki (988) - applied to the non recessed areas of the uniform.


A slightly better shot - after the uniform highlight I mixed Khaki (988) with Ivory (918). This was then applied to the non recessed areas of the webbing, backpacks, pistol holsters, and puttees. I used the same highlight on the camo strips on the helmet.

Just another version of the above shot.

Again, slightly better shot showing the highlights.
This is me experimenting with skin highlights - something I'm still not too great with.


Next up will be the matt varnish, which will remove the shine and add another level or two or protection to the models.

Sunday 26 May 2013

Sunday research

Like most geeks, nothing gets me going on a Sunday morning like sleeping late and reading in bed.

Well ok, a few things, but lets not go into those...

This morning I was faffing about on Google on my phone, and came across this chap on Scribd. He has a uploaded a huge number of Concord books. This set me to looking, and I found this chap who has a whole load of osprey books up on the same site. There are a lot of WW2 reference books scattered about on there.

Now - I will add that I have no idea of the legality of uploading books to Scribd. I suspect that it's not something people should be doing. Or the legality of looking at web content that someone else has uploaded. Or generally even the legality of writing blogs.

However, there were some nice books with nice pictures there - worth a look!

Saturday 25 May 2013

Army Painter Quickshade on British 15mm models

Unusually for me this weekend I had my son on the Friday night, meaning tonight I found myself at a bit of a loose end. Yesterday I managed to get all my currently painted model to a point I was happy to move on to applying the Quickshade, so I bit the bullet with the weather being nice today and cracked on with that.

So here's my little tray, ready to go!


Quickshade (after initially using the Mid tone on my models, I was convinced to try the Dark tone) and stirring stick. Turps and a jar for pouring the turps into. Also included (but not in the photo) is my Quickshade brush, which is a beefy .25 inch. I use this for both applying and removing the Quickshade. And also my trusty rag, which I use for cleaning my brush and hands. In the event of a match ever landing near the rag, I may be in trouble.

So, some before shots.


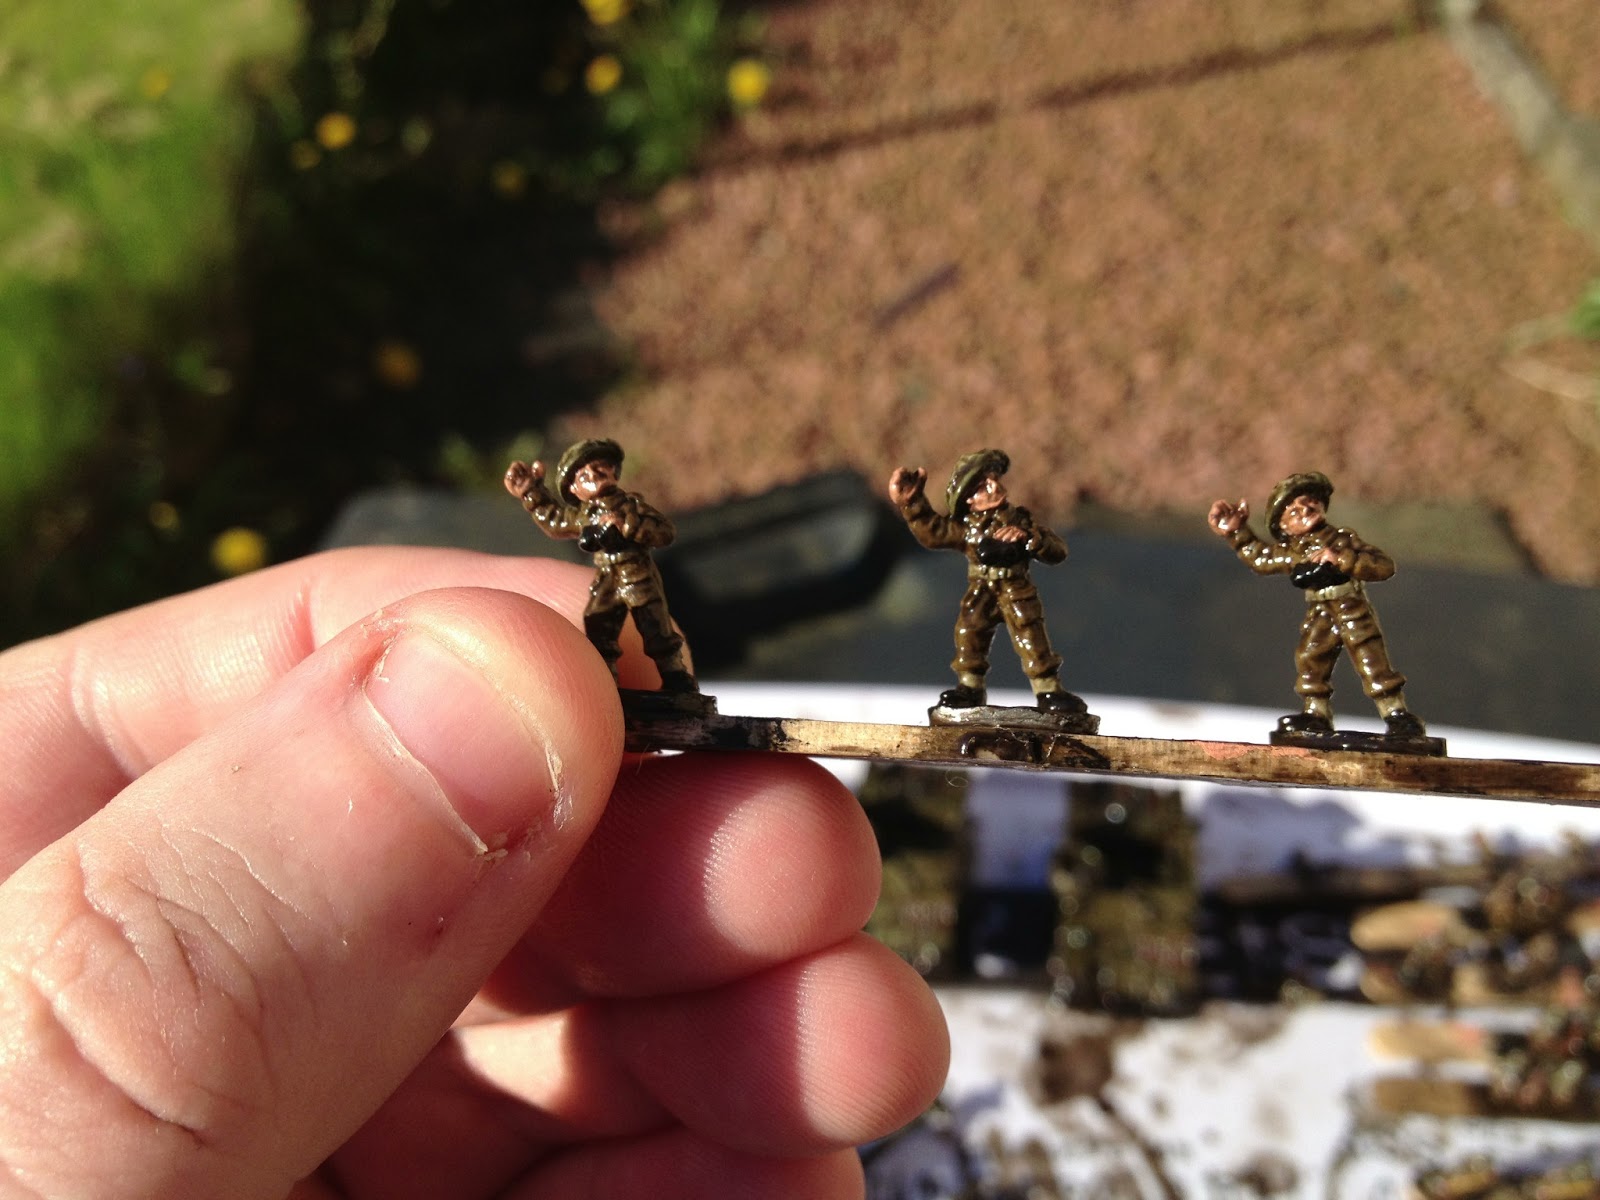
As you can see, I've used this tray before! Also of note at this stage is I'm still working from the lollypop sticks for my infantry and I've not done anything with the bases on the Defrocked Priests.

Incidentally the pack of Defrocked Priests from Waugh Games has never turned up. The company have been very good via email, and it does seem to have just vanished into the postal system. I was down in Middlesborough at the start of the week and they were happy for me to drop in, however did not have the model in stock (the reason they knew it was posted was it had been the last one and needed re-ordered). So far they have been very friendly and helpful and are happy to send me a replacement when the item is back in stock. I'll give them another week or two before asking for a refund.

So, steps for using Quickshade. First of all, make sure it is shaken very well. Then shake it some more. Then open it and stir it thoroughly. For those interested, it looks like this...


So far I've painted a whole Infantry company, about 40 vehicles and 10 or so guns - and I've hardly made a dent, so well worth the money.

I've heard of a few people having issues with this stuff, but most of the time it seems to be that it's not mixed properly. The pigment and the varnish can separate when it's been sitting for a while, so mixing well is critical.

I use the brush on method rather than the 'dip' method, so I load up the brush and really lather it on.


Making sure the model gets a good coverage of the stuff. It's messy and your going to get sticky fingers. This is where you find out if the models put together stoutly. In this process I had one gun lose a trail leg, and one Defrocked Priest lose a .50 machine gun. These will be glued back on later.


The instructions are that you should leave the model well lathered for about a minute or so, then remove the excess. What i didn't do this time round was take into account the fact I was doing this outside in strong (for Scotland) sunshine and with photo's along the way. This meant I may have left the Quickshade on the vehicles and guns for a little longer than I should have - but this will be fixed with drybrushing later.I should really have been ready to take the excess of the 1st gun after i had finished the 4th, and same with the tanks.


Not perfect this time round, but every day's a school day!

Next up the infantry. Same idea, really give the Quickshade a stir, then lather it on to really coat the whole model. Don't be shy!

Then after leaving it about a minute (with the infantry the time it took to do all the sticks was perfect timing to take the excess off) just clean the brush, rub it on the rag then use it to dab off the excess, cleaning on the rag as you go.

Before...

After


Next up for these models will be highlights (and drybrushing for the vehicles). Then a couple of coats of matt varnish to take the shine off.

Addendum: Using the Army Painter Quickshade and the lollypop sticks (as well as models with cast on bases) can see the models being stuck to the tray when the Quickshade dries. It's important that you keep the models apart, so as not to weld them together with the varnish. When it comes to taking the models from the tray, I use a fork to just gently pry the models from the tray. I'm sure modelling knives and the likes would work as well.

Wednesday 22 May 2013

Decaling in 15mm

From some of the previous pictures I've posted, you will probably have noticed I'm a big fan of using decals on my 15mm vehicles.

This is partly to emphasise the historical element I'm aiming for. I was very annoyed for a long time that I couldn't find 15mm decals that cover the 33rd Armored Brigade. My normal supplier of decals is Doms Decals, who provide a wide range of high quality 15mm decals. However, they don't do that particular armored unit. And neither do Battlefront (as an aside, I saw some Battlefront FoW decals recently at Carronade, and they looked more like 20mm decals). Eventually I found a company called 1-144direct.com that stocked the required markings. The decals themselves are from the 'decal details' range, produced by (I think) http://www.i-94enterprises.com

Neither could I find decals for the markings known as AoS (Arm of Service).

144 RAC's AoS markings at the time of operation totalize was a red square with 174 in white on it. This was on the left hand side of the tank, with the brigade marking (a hourglass - sometimes called a Diablo marking, green on top and black on the bottom). In the end I went with 8th armoured brigade AoS markings, as they included 124 markings. With a little red and white paint I managed to get the number required.

The AoS markings were normally fixed within something like a Division, so you can tell at a glance what part of the Division the vehicle belongs to. For example, an infantry divisions Machine Gun battalions AoS was a white 67 in a black square. The vehicles of the 3rd battalion of the 3rd brigade in a Division would be a white 69 on a brownish/reddish square, etc. Combined with the Divisional badge, this tells you what unit the vehicle belongs to. Of course, that's the theory...


Alongside the brigade and AoS markings, I also added the squadron markings (depending on whether the tanks were in HQ, A, B or C squadron the tanks would have a square, circle, triangle or diamond shape on them). The colour of these symbols would define which regiment in the brigade the tanks were part of (in the brigade these were in order of regimental seniority Red, Yellow and Blue).

For my tanks I went for a yellow square, signifying B squadron. I can't remember why, but I believe it was to match the turret numbers I had. For 144 RAC it seems that the squadron markings were mounted in the hull sides - roughly under the turret. 

Unfortunately, my lack of planning when it came to my stowage on my tanks prevented me from putting the turret numbers on. Something I'll watch in the future. They should have been on the sides and rear of the Shermans turret.


I also went for a Allied recognition star to be mounted on the turret top. I think these are pretty smart, and these Shermans seemed to lack any of these stars. I would have considered the engine deck for these, but again I had already covered these in stowage for most of the tanks. 

Towards the rear of each tank I also mounted the War Department Number of the tank (the vehicles unique registration number). 

Similarly, my other vehicles also had the various WD numbers and recognition stars. As well as the 51st Highland Divisions ToS and divisional sign. 


I like these details on vehicles of this size, they contrast nicely with the green of the vehicles, giving a splash of colour. 

One of the issues I did come across was models where stowage wholly or partially covered where the markings should be. In these cases I trimmed the decal to look like it was being obscured, or left the decal off all together where it would be totally covered. Like the star on the bonnet of the jeep below. 


Easier to put on than you think as well!

Monday 20 May 2013

Artillery command team

One of the things I wanted to do, to compliment my two little truck dioramas (shown previously) was make my artillery staff command team a bit different.

In Flames of war the artillery staff command team allows for a couple of special effects when using artillery on the table. Artillery actually on the table is a bit of a bugbear of mine. I accept I've read several accounts of 25pdr batteries being deployed in front of infantry positions prior to attacks, but generally I hold the belief that if your artillery is in sight something's already gone very wrong. I've had to bite back this belief in both 40k (previously I had a large imperial guard army) and in FoW. It would be wrong to not include the 25pdr - it was a common and well liked bit of kit. I mentioned before about tales of captured Germans asking to see the 'belt fed' artillery. Any WW2 account by British and Canadian infantry from the Normandy campaign talks about their relief and reliance on their divisions 25pdrs. Always on call, responding faster than any other nations artillery, laying huge amounts of fire to soften up German defences or break up German attacks and counter attacks. There are a couple of must reads for anyone interested in this - The Guns Of War is a great one to look up, covering the 2nd Canadian Divisions fighting in Normandy. 

One story tells of how in training in the UK whenever the artillery (which was always riding in their quads and trucks) passed the infantry (who had to walk everywhere) there would be catcalls and jeers from the infantry. On this occasion in Normandy the gunners - with their knowledge of the horrors the infantry were facing having to advance under fire while suffering from dysentery, walking everywhere, living outdoors and the massive casualty rates (some infantry battalions suffering more than 200% losses) - passed a battalion of Canadian infantry lying exhausted by the side of a road waiting on orders to advance again. Expecting the usual jeers and catcalls, the gunners were reduced to tears by applause and calls of 'keep up the good work' from these men they respected above all others. 

So how could I not include these guns in any British army I build?

Anyway, I made the decision to use a round base for my artillery command team, to make it stand out more. The team itself is static and relies on a truck for transport. 


I used some 15mm accessories from Peter Pig, mainly the table with map, the chairs and the artillery ranging scope. I had included in the above pic one of Peter Pigs tea drinking figures. However I found the model looked very small compared to the Battlefront figures. I used the model instead on the tea drinking diorama. The final version was this:


This base is paired up on the table with the two 15cwt trucks to make the artillery position nice and interesting. 

Now if only someone made a 15mm British dispatch rider model! 

Almost there...

Having had Friday off and my son staying over Saturday till today, tonight's the first night I've had to continue work on my 4 x 17 pdrs and 4 x defrocked priests. 

Work on the 17 pdrs was delayed due to me being unhappy with how one of them was sitting. The gun shield seemed squint and one of the legs was wobbly. I ended up taking the whole thing apart, cleaning up the joints and rebuilding. I've now got the 4 guns to a point they are ready for a coat of quickshade dark tone. 

The defrocked priests are also nearly there, with only a few little bits to finish. Mainly the back of the crewman inside, the metallics and a few other little bits. The tracks where time consuming to paint, and as the running gear is the same as the Sherman the small bogey wheels got a black lining as well (they were rubber lined). 

Still no sign of the last pack of these models. That's Waugh Games had since the start of may. These people may be going on my blacklist soon! 

Friday 17 May 2013

You did WHAT...?

No painting today due to having two (yes, TWO) painting related injuries.

The first, much to many peoples hilarity, is I seem to have hurt my right elbow in a RSI type way from holding small figures up to the light while painting them.

The second is that I stupidly left the paint on the left hand side, meaning I was twisting to put paint on the brush. Combined with cutting the grass, I managed to hurt my back. Not badly, but enough for it to twinge.

So I took the day off! And who says wargaming is a safe hobby!

Whats the objective?

One of the little projects I was working on came about due to an idea I had on seeing what would normally be considered a bit of tat in a charity shop.

The item in question as a miniature replica of a Distinguished Conduct Medal, packaged by a company called WestAir. The medals are part of a range they sell, like those found here.

This medal sat in my 'modelling box' for a few months, until after I had been to the Haugh Battery down in Hartlepool with my gorgeous girlfriend - who very kindly tagged along while her geeked out man fawned over various bits of artillery, tanks and guns. Here's a wee selection of pics.

Bren LMG

5.5 Inch Howitzer, WW2 era British medium artillery gun


Me, in front of a Chieftan (cold war era British tank). 

The ubiquitous British 25 Pdr. Possibly the best bit of field artillery during WW2. Flexible with a rate of fire so high that German prisoners asked to see the 'belt fed' artillery.


40mm and 3.7 Inch AA guns. I believe the vehicle on the right is a Sachren or a Saladin?

5 inch coastal artillery gun.

At the little museum shop, I picked up another two of these medals by the same company. The NWE Star and a Military Medal.

In between painting my last batch of models, I had a think about what I could do with these. I had a vague thought, having seen similar kinds of things sold online, normally resin bases with Divisional or National markings on them.

While doing a bit of research into Operation Totalise (or Totalize/Totaliser depending on the source), I came across a site that had scans of actual WW2 situational maps. I managed to find the one suitable for the day of the operation, and via a little bit of jiggery pockery managed to get something I could print.

Here's a link to the site - they are the daily operational maps of the 12th Army Group - I've linked to August 1944's maps, but there are others. These are at the divisional level.

http://www.wwii-photos-maps.com/twelfthalliedarmygroup/1944/August/index.html

So, after all that, I had a think about how I could use these.


I had some of these spare round bases from Warbases (I can't remember the size I'm afraid. I think they were 2mm thick MDF and about 2" in diameter).

The end result was this:


These markers can be used to mark objectives on the table for my army. The look good, although they could do with a drybrush, apparently...

So, again, there you have how a chance thing found somewhere your not expecting can actually be useful to your hobby and your army!