Showing posts with label Operation Pomegranate. Show all posts

Monday, 26 February 2018

AAR: Operation Pomegranate, 17th July 1944 (Battle of Noyers, part 4)


Hi folks,

I posted yesterday (here) the player briefings for Sundays big game with 'The Old Guard Wargames Club' in Northallerton, North Yorkshire. I was pretty beat last night when I got home - but running a big game for 6 players will do that to you!

This game was the fourth in the series of linked games we've played (or at least, club members have participated in!). It started with (#1) 1/6th South Staffs of 59th Infantry Division, along with tanks of 144RAC's (33 Armoured Brigade) B Squadron attacking Brettevillette on the 16th of July, 1944.

We then played (2#) the attack by A Coy, 2/6th South Staffs and A Squadron 144RAC onto Point 126 and an attempt to reach Noyers Bocage itself.

We followed this with a night battle (#3), where 2/6th South Staffs were advancing to clear a start line for the next days fighting, while being counter attacked by 9th SS Panzer Division trying to regain control of Noyers railway station.

This game was therefore (#4)! 1/6th South Staffs attacking Noyers from the orchards to the north, while a company of 2/6th South Staffs attacked from the east.


The map for the game was set up using a mixture of the map above and an aerial recon photo I have from some files on 144RAC that were photographed for me at Kew.


Hopefully, if you compare the aerial photo above to the picture at the top of this blog, you should see some resemblance! Of course, as I have a 'mobile' setup, it's very difficult to get things exactly right, but I think it was pretty close!

The table was set up using my terrain, other than the table matt/cloth, which was borrowed from Dave D. Overall, I'm happy with the terrain, but as ever there are area's that need improvement!

For game rules, we were mainly using Flames of War v4 (with a few tweaks to fit the scenario and a more spread out German defence). Nice and easy for the guys to pick up and gives a decent enough approximation of the combat while keeping turns nice and short. Yes, there were a few tweaks to the rules, but I would have had to do this with any rules set.

I also had a system of off table artillery for both the Brits and the Germans. The Brits (who were the players, the Germans were deployed on a sketch map and only revealed when encountered) could activate 'random events' on the table, and collect the tokens to then spend on artillery or reserves.

The Brits were attacking from two directions - directly into the village, and up the map cross country. Both faced different challenges, and had various options. Angus led the company attacking into the village, along with Ian and Martin (who's account of the game can be found here). Pete, who hadn't played in these games before, led Roy and John in the across country attack. Both commanders decided that it would be a good idea to attack before dawn, so as to get 3 turns of darkness to close with the German defences. After some discussion, it was decided not to use a preparatory bombardment, and make use of stealth.

Everyone had a depleted infantry platoon (only 5 infantry teams, HQ, PIAT and Mortar) to account for the previous days casualties, along with a troop of only 3 Sherman's (only some of the Sherman troops had Firefly's, again taking into account the previous games casualties). Angus also had a Vickers MMG platoon and Pioneers, while Pete had a 3" Mortar platoon.

I'm afraid, what with running the game for everyone, I totally forgot about pictures for the first few turns!

The whole table, with British forces already advancing. Note that the table is more or less empty otherwise - the players have no idea where the German forces are, although at times they were given indications of areas of engine noise, or the general idea of where Mortar fire might be originating from. 

Angus' and his comrades move into the village, encountering a deep ditch (supposed to encourage the use of engineering assets, but they never asked for any!). Ian lost a platoon of infantry during this advance to fire from the houses while he was in the open. Martin got his platoon into the village, took out some 5cm A/T guns, but didn't get too aggressive. Angus fought a prolonged firefight with German troops in the stand alone dark grey building - using the Vickers as well. He took casualties and was pinned by heavy MG fire and artillery/mortar strikes. 

Pete's infantry closing on the hedge line. Some good night visibility rolls spotted a lot of the German units holding the line. However, this image probably shows the limits of Pete's infantry advance. This platoon stopped and failed to dig in, was pinned and then spent the whole game pinned. Roy, on his right, got random events which meant his troops were slightly drunk, which improved their HtH ability (too much Calvados). He skillfully used a ridge in the field to get close, and assaulted his way up the table. I think he killed more German units that anyone else with this one platoon. John was on the far right, and used his infantry and tanks carefully to get to the village and support Ian. 

German guns, deployed as per Dave's instructions! Carefully hidden behind the closest hedge. If the Brits had attacked in the daylight with their Shermans, things could have been very messy. 

88's and 2cm AA...

Infantry with MG42 in the barn, backed up by 2 Pak40's. 
The game moved pretty quickly, with the hedge line being breached and Pete's company's troops moving forward (with his own infantry cowering in the rear). I think Pete used about 1/4 of the counters on the table to try and kill the single 88 on this hedge line with artillery... Including multiple 25 pdr strikes, 5.5" gunfire and a strike by Typhoons!

Meanwhile, Roy took out the infantry, Mg42, Pak and another 88.... and got another 'Calvados stash' result, meaning he was hitting on 2+ and suffering a -2 penalty to shooting due to his troops inebriation. I think his Lieutenant might be in for a DSO or MC he can't remember earning.

Meanwhile... it looks quiet... too quiet...

German defenders are discovered, with a 5cm A/T gun and 2cm AA gun covering the road. The building on the left was also occupied by grenadiers with an attached HMG. 

Angus keeps moving forward!

The house of woe. Eventually, it would fall to the Brits - only for a 9th SS platoon to assault out of the nearby houses while MG42 fire killed the occupants (5 failed saves and I rolled 5 '6's' for firepower...). Much was the Brits disgust at losing the building they had fought so hard for. As a result, it got special treatment from some reinforcement 'Crocodile' flame throwers. 

Roy's assault about to go in, while John has penetrated the defences and found another 88. 
The difficulties in town fighting were soon apparent, with the Germans in buildings proving very hard to shift by normal rifle fire. German arty and mortar fire was also effective, killing Brits as they tried to move up to assault and pinning the units down - momentum was starting to be lost in the village.

Another view of Roy's platoon, about to charge the barn! - and the Shermans arrive, only for one of them to get knocked out by a Pak40.  The vulnerability of the Shermans to the Pak40's seemed to come as a bit of a surprise...

Pete's troops move backwards, away from the German 2cm AA and 88, while the Mortars arrive and deploy. 

88's view of the Shermans

Roys attack goes in! And finds another cache of Calvados... Roy takes out the infantry and Pak40 - the 88 crew leg it and abandon the gun (my call as umpire, they could do nothing to stop rampaging infantry). 

The firefight continues, although Shermans had now arrived. 

Once the armour game on, the Brits started to move forward a bit - I think Roy's determined assaults gave a clue as to the best way of shifting dug in Germans!

Unfortunately, allied armour wasn't the only armour in the area!

The StuG's had spent a lot of the game bailed, due to allied random events which specified the closest armoured vehicle became bailed - when they had no armour on the table! Trouble starting those engines, I suppose!

Typhoon attack on the 88's - spot the yellow 'smoke' with the platoons at the back! I was using skill checks for simple things, like the Typhoons identifying the target, and the Brits popping smoke to avoid being hit themselves. 

There were, at one point, a platoon of Grenadiers with an attached MG42, a platoon of 9th SS Panzergrenadiers with attached MG42 and a (depleted) grenadier platoon... with MG42... in this line of houses. As the defence here seemed stable, one platoon of grenadiers moved back through town to try and counter the British penetrations ealswhere. Using buildings for cover, the Brits lost track of them and believed them to be a new unit when they appeared again. As the units were in buildings and 'unspotted' other than through their firing, I didn't need to deploy them to the table until they became visible. Similarly, troops in the church never became visible, although they were firing out. 

German AA in the churchyard - who would later shoot down a Typhoon. The church contained a platoon of SS with MG42, a single MG42 which had fallen back from the grey building and joined them and an OP team in the church tower (who was never shot at until artillery hit the church). It must be one of the top 10 rules in Normandy - take out the church tower! 

British armour advances - encountering a Pak40 behind the buildings on the right, which bailed the Firefly. Ian's tank on the road between the buildings (far side of the town square) forgot there were Germans in the building to it's left, was bailed by a panzerfaust then destroyed by an assault by the infantry. Tanks in built up area's don't work well!
By this point in the game, the Brits well and truly had momentum. Infantry and tanks were getting into the town, and the cross country German defences had collapsed (mainly due to Roy's platoon assaulting it!).

Roy and John moving up to the 2nd hedge line. The Pak40 duel with the firefly can be seen here - the Brits had no idea what was in the field till the tanks parked alongside it - I had British recce as reinforcements, but none was requested - although Pete got some Stuarts while trying to get armour for his side. The Pak40 kept failing it's firepower check, so the tank was only bailed. 

The Croc's also arrived. 

German defences re-organising. Both StuG's died without achieving much. I did have Panzer IV's to bring on at a random point, but kept forgetting to roll for their arrival. Too caught up in the game! 

Brit armour moves in to hammer the church - there is actually a German Panzershrek team in the burnt out building on the right, but the game ended before they could fire. I think the Brits would have lost more tanks in another turn or two - there were German infantry AT assets still active in the town, and the Brit infantry wasn't really moving up with the tanks. 

The Vickers occupied the grey building - which must have been swiss cheese by this point!

British infantry penetrates the orchard from the country side of the board. The Pak40 is taken out in an assault by Roy and John's troops, while Roy's troops also send the fusilier platoon running.  
Then it was time to pack up. I think we can say that the Brits managed to secure the centre of the village with their armour - though I think they might have had a sticky time until the infantry got forward. Martin had infantry and Pioneers in the town, and Ian had infantry - but they were happy to let the tanks do the heavy lifting I think!

German Mortars had been dug in behind the church, but as their presence was never going to make a huge difference, I didn't deploy them in sight. If the game had played on, I would have!

A Typhoon strike killed a retreating Pak40, but one of the Typhoons was brought down by the AA in the churchyard. 

Roy's infantry got a 'lost' event, and went in the wrong direction... almost like they were drunk... I'm going to rename that event as 'contradictory/garbled orders' I think. 

Pete's OC and OP teams, trying to catch up!

The whole board, at the end!

Pretty pleased with the town, but I think it would have looked better with more setup time and a bit more greenery. Outbuildings and maybe some more houses are still on the cards... 

So that's it!

The players have done better than historically was achieved, but I think the defences historically were far tougher, with the recce battalion of 9th SS being committed to the fight, as well as armoured assets from 9th SS which included Panthers, StuG and Panzer IV's. German artillery and mortar fire was also more prevalent than I think I used. I think this was a tougher game for the players this time, but to their credit they used very few reinforcements and worked as a team. The empty battlefield really adds something!

Everyone seemed to enjoy the game, and as players they were great fun to umpire for. Fingers crossed we can get something like this going again, although whether we continue with Operation Pomegranate or try something else, I don't know! Certainly, as a proof of concept for how I'd like to play historical based WW2 games in the future it worked well.

Thanks to Angus, Pete, John, Martin, Ian and Roy. Thanks also to Dave D for use of the matt! For more pictures, check out Martin's blog post!


Sunday, 25 February 2018

Operation Pomegranate - Battle for Noyers part 4, Player briefing


Hi folks,

Battle report to follow, but here's a copy of the player briefing for yesterdays 4th game in the series. One little pick of the table, just to show whats coming!


Operation Pomegranate

Origins (History)

Operation Pomegranate (also known as the Second Battle of the Odon) was a series of operations fought by the British Army in World War II in mid-July 1944 against Panzergruppe West as part of the Battle of Normandy. Operation Pomegranate were intended to draw German attention away from the upcoming assault from the Orne bridgehead, codenamed Operation Goodwood. After four German infantry divisions arrived in Normandy, the objective was to prevent them from replacing German Panzer divisions deployed opposite the British Second Army for operations against the First US Army, which at the time was preparing to break out of the German defenses (Operation Cobra).

Strategic Plan

XXX Corps launched Operation Pomegranate on 16 July. The objective of 49th (West Riding) Infantry Division on the right is to capture Vendes and the surrounding area, in the center the 59th (Staffordshire) Infantry Division is to capture the villages of Noyers-Bocage, Haut des Forges and Landelle and on the left the 53 (Welsh) Division is to attack, ready for the corps to advance towards the high ground north-east of Villers Bocage. 33rd Armoured Brigade is to support the efforts of 59th (Staffordshire) Infantry Division.

Tactical Plan – 59th (Staffordshire) Infantry Division, 17th July 1944, Phase IV

Phase I of the attack began at 05:30am on the 16th, with units of 177th Brigade supported by 33rd Armoured Brigade clearing their start lines and advancing. On the right, despite encountering stronger than expected resistance, which saw the leading units taking heavy casualties, 1/6th South Staffs supported by B Squadron 144 RAC have successfully captured their objective (the hamlet of Brettevillette and Quedeville). With this objective in Allied hands, 1/6th South Staffs then switched to the defensive to allow the Phase 2 forces to pass through.

On the left, 5th South Staffs, supported by C Squadron 144RAC, advanced to capture Les Nouillons. This attack ran into several unmarked friendly minefields, but achieved its objectives.

Phase II of the operation began at 1pm, with A Coy 2/6th South Staffs and A Squadron of 144RAC passing through Brettevillette to capture Pt 126 and Noyers Railway Station before pushing through to attack Noyers village from the North. At the same time C Coy 2/6th South Staffs, supported by available tanks from B and C Squadron 144 RAC, advanced from Les Nouillons and attacked towards Noyers village from the East.

Both attacks encountered heavy resistance and stopped short of the village as night fell.  Overnight, efforts by A Coy 2/6th South Staffs to secure a start line to the south of the Railway Station, for a morning attack by 1/6th South Staffs into Noyers, ran into a determined German counter attack, including Panzers and infantry from 9th SS Panzer. Despite muddled and at times hand to hand fighting, the German forces were beaten off and the start line secured. 

Today, 5th South Staffs will attack south towards Missy, securing Bas De Forges and Haut Des Forges. Despite yesterdays casualties, C Coy, 2/6th South Staffs are to continue the attack south west into Noyers itself, supported by B Squadron, 144RAC. B Coy, 1/6th are to attack south into Noyers, supported by A Squadron, 144RAC. Additional support is available from 79th Armoured Division.


Terrain

The area around Noyers consists of large crop fields bounded by tall hedgerows. Orchards and sunken lanes are prevalent. Several enemy minefields were discovered and breached during the Phase II operation, further minefields may be encountered on approach to the village.

Known Enemy Forces

Infantry from the newly arrived 277th Infantry Division are confirmed to have taken up prepared defensive positions in the Noyers area. This Division has newly arrived in Normandy, and is believed to have been transferred from coastal defence duties in Southern France. Yesterday’s fighting has shown that they are heavily supported by dug in and concealed anti-tank guns - dug in infantry and machine gun positions also offered heavier than expected resistance. SS infantry units appear to be reinforcing German Army units. The enemy has deployed minefields as part of his defensive network.  Enemy Self Propelled A/T guns were engaged and destroyed during the fighting yesterday, as was a single Panther from 9th SS Panzer Division. Overnight, Panzers from 9th SS Panzer Division launched localised counter attacks. Several were knocked out, but intelligence places more in the area.

Objectives

C Coy 2/6th South Staffs, supported by B Squadron 144RAC, are to advance from Les Nouillons SOUTH WEST across country and attack Noyers from the EAST.

B Coy 1/6th South Staffs, supported by C Squadron 144RAC, are to advance from PT126 SOUTH and attack Noyers from the NORTH.
As such, objectives will be:
  • The capturing of NOYERS church
  • The securing of the roads SOUTH and WEST from the village
  • Attrition of enemy forces, especially armoured elements

Points of Note
  • Preparatory bombardment will be available to support the attacks. A forward observer (FOO) from 116th (North Midland) Field Regiment has been attached to each company to provide fire support.
  • Both 177 Brigade and 197 Brigade are engaged in offensive operations today, demand for artillery support is expected to be high.
  • Enemy armour is known to be in the area, specifically PANZER IV’s and SP guns from 9th SS Panzer
  • The tanks of 144 RAC will be available at first light.
  • Specialist armoured support from 79th Armoured Division may be available to overcome enemy strongpoints and clear encountered minefields.  
  • The village is larger than anticipated. Both Companies will be required to secure it.
  • Be prepared for local enemy counter attacks, especially supported by enemy armour.
  • 5th South Staffs will be advancing to the SOUTH in a SOUTH WESTERLY direction – this does leave 2/6th South Staffs flank open until 5th South Staffs secures their objectives.


Monday, 23 October 2017

FoW v4(ish) AAR: The Battle for Noyers Phase IIb

Hi folks,

Yesterday the Old Guards Wargames club had a Sunday games day, with most of the members who attended playing 10mm ACW using Regimental Fire and Fury. While they were doing that, myself and Martin were fighting the next stage in my series of linked historical battles using Flames of War v4 - with a few tweaks I've introduced to cover random events and off table artillery.


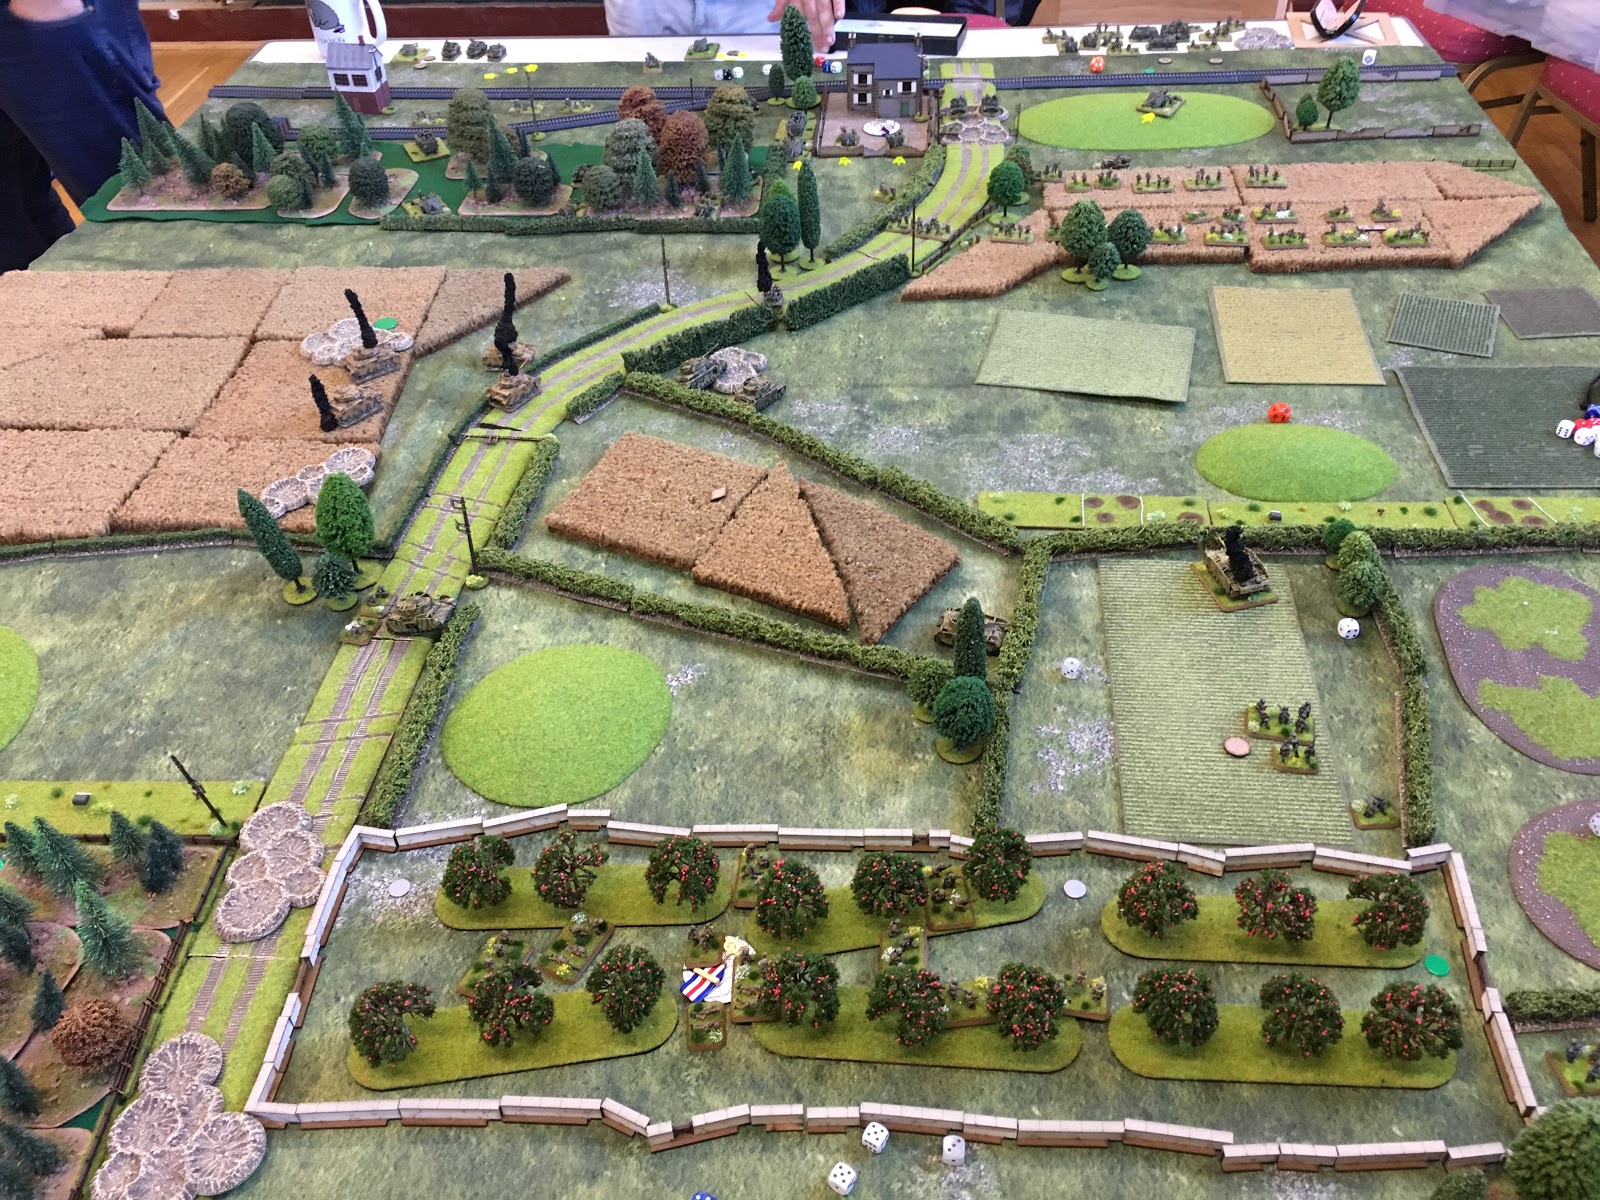
Regular readers might remember the large table from back in May (photo taken from the opposite end of the table than the picture above!):


The idea this time around was to have a British night push to capture the 'orchard' (on the left of the picture below - the forest closest to the far away town in the picture above) while at the same time securing the railway station (the large grey building by the railway in the picture above) from a German counter attack.


So this time around, we tried to replicate that section of the original table (the size was slightly out, as we used 3 tables where we should have used 2 - the whole battlefield was 'stretched' by a couple of feet!). So from the railway line to the orchard was replicated.


You can see the British briefing document here. In short, orders were for 2/6th Staffs to hold the ground they had taken during the day, but above all hold the railway station. In addition, they were to capture the orchard for use as a start line for the next attack on Noyers (the next game) by 1/6th Staffs who would be attacking in the morning.

Martin had the remains of the forces on the table in the last game. Two under strength infantry platoons (7 stands rather than 9) and two full strength platoons.  A Pioneer platoon, 2 detachments of 2 6 pdrs, a 4 tube mortar platoon and a single 17 pdr. In addition, he had a Forward Artillery Observer (FOO) with a lot of off table artillery support! This included 2 defensive fire markers and 1 'SOS' (Final protective fire) marker.

Reinforcements for the Brits came via the random events table - which was rolled on whenever a unit came within 3"'s of one of the small green tiddly winks. On a D20 roll, there were 3 possible reinforcements. Martin just kept rolling those numbers, and as such got far more kit than he needed. Something I will need to revise for future games. See the end of the article for the contents of the events table! The collected tiddly winks then became allied artillery tokens.

To make matters more complicated, we were using the night fighting v4 rules, with no option for daylight. I bought a couple of sets of muzzle flash tokens from Charlie Foxtrot Models (don't be put off by the postage price, contact the owner and he will do a better rate on the counters) so we would be using these to denote firing units. Each unit could only see d6 x 4", determined when checking LoS. Unless shooting at a unit that had fired - in which case vision distance didn't have to be checked. units were also limited to moving at Tactical or cross country dash speed. Cross checks were at +1, as was shooting.


Rules wise, this was a v4 game, with whatever tweaks I deemed we required to make the game work with the other changes I had made. I would have had to make similar changes if using v3.

The Germans had initially 4 x Panzer IV's (Fearless Vets from 9th SS Panzer Division, which could only move forward if directly supported by infantry, reflecting the tanks vulnerability at night and the effect that has on the crews morale), 1 fusilier platoon (rifle armed scouts), a 9th SS Panzergrenadier platoon, a 2 gun Heer HMG platoon, 2 Grenadier Heer platoons (from 277th Infanterie Division), a StuG and an OP team.

Later, they were reinforced by a further 4 Panzer IV's from 9th SS and another Panzergrenadier platoon.

German plans were provided by Matt Varnish following a discussion on a paint and chat. Matt kindly dropped me an email with details, which meant he was almost playing the game from all the way in Canada! Failure of this plan was my fault as a GM and scenario designer, rather than an issue with the plan!!!


Movement over the table was hampered slightly by the two defensive German minefields left over from the earlier battle. While some of these had been gapped by the allies, I took the view that in the dark, without specific knowledge of where the lanes were, the Germans would have to gap these fields themselves.

Martins plan was (I believe) to hold the open flank and advance on the side with the cover, attempting to take the orchard. As such, he deployed pretty far forward with his infantry on his left (my right) and had his A/T guns further back.


Early advances and artillery fire saw advancing German troops in the orchard pinned. I was only deploying command teams initially, so as not to give the Germans plans away! The StuG was shifted about quite a bit, due to 'lost' special events being triggered (there were a few of these in the events deck - I thought this fitted a night battle). This meant the unit was moved 2d6 in a random direction.

Martin started to advance, but ran into advancing Germans and lost some troops. Following this, he decided to abandon his forward defence and fall back.


British reinforcements had started to arrive (anti tank guns called forward by nervous infantry commanders hearing tank engines in the night). Two more 6 pdrs and another 17 pdr. Along with an ambulance jeep (auto unpins one unit within 4"'s at the start of a turn). Also of note was Martins 2IC, who received the effects of a special event (officer casualty, closest command stand is pinned). He spend most of the start of the game pinned, until he met the ambulance. We had quite a few things happen in the game using the events that we had some fun making up little stories for. Like the mortars getting lost and going backwards - they were between two railway tracks, and someone in the darkness obviously thought the rear track was the front track... etc.


Eventually, a new front line settled. Here was where a major failing of the artillery system for the Germans came in. My logic had failed, and I need to revisit the whole system. The Germans got no artillery the whole game, which really stymied their advance.

A gunfight ensued between the StuG and the newly arrived 6 pdrs. Eventually the 6 pdrs won, but were then driven off by small arms fire themselves.


On the other flank, the German armour advanced - the plan taking them right over the top of the British SoS fire task marker.

Martin gleefully dropped what's technically known as a 'sh*t tonne' or artillery on the unit, using up a large quota of his artillery counters. While he was disgusted to find the tanks could not be harmed (v4 Nerfs to artillery barrage A/T values), the 'drumfire' of 25 pdr and 5.5" fire killed 5 of the 7 infantry teams. The whole lot fell back the next turn, as the Panzers were also under anti tank fire from the treeline. The remaining two 'fearless' SS Panzergrenadier teams faded into the night (failed motivation and fled), leaving the tanks with no support. A long range gunfight with the 6 pdrs (and a single shot from a 17 pdr) took out the whole unit in short order.


Realising that the Germans were onto a total kicking... I used my GM perogative and brought on another 4 Panzer IV's and Panzergrenadiers. They advanced while the battle was still raging.... All the first 4 Panzer IV's achieved was to kill a Universal Carrier and drive off the rest of the platoon (failed motivation).

I also added a rule here - knocked out vehicles burned on a 4+ (I will revise this in the future to vary depending on the vehicle). A burning vehicle illuminated all units within artillery template distance. We also had mortar fired illumination rounds in effect as well!


Eventually these forces hooked right to avoid the A/T fire from the woods, while Martin took the chance to exploit the empty German flank with an infantry platoon and dismounted carrier section (2 infantry MG teams and a PIAT Team, not a v4 rule, but something have decided to do for these scenarios, as it matches British tactics).

The Panzergrenadiers advanced aggressively, taking out one and damaging another of Martins platoons and almost making it to the station, before being cut down.


Without infantry support, and being hammered by artillery, the German attack petered out and started to fall back. To the rear, British troops moved swiftly towards the orchard, cutting off the Germans retreat!


One German tank tried to run down the road and found it's way blocked by infantry. Assuming they were friendlies in the dark, the crew were shocked to suddenly be hit by PIAT fire. Bailed out, they were then assaulted and captured! The other tanks struggled to cross hedges in the dark, but most of them would have made it back to Noyers...


In the orchard, the British assaulted the remains of the last (pinned) Grenadier platoon (with attached MGs). The MGs were wiped out and the remaining Germans fled the orchard, leaving the start line in British hands. 


Ready for phase III!!!

Things I need to look at:

- Artillery system. The Germans had none all game. The Brits had lots - but I didn't feel they had more than they should have (from recent reading). The German attacks were being broken up by arty fire, which seems to fit the theatre. I had made some decisions during the game on mechanics of the arty system that didn't work... I've some ideas for how to resolve this - mainly having the Germans collect the events tokens as well and use them as well (having their own pool and being able to call in fire - perhaps both sides can spend tokens for counter battery fire...).

- Reinforcements. Fewer options included in the events chart (replicated below). The reinforcements themselves were OK (cooks and clerks and walking wounded would have helped boost the strength of a depleted British infantry platoon).

  1. 1. Delayed – nominated unit cannot move next turn OR next reinforcement roll is ignored 
  1. 2. Covered approach – unit may make immediate move 2d6 in a chosen direction, counts as in cover at end of movement. OR next turn 'Blitz' 4+1D6".  
  1. 3. Reinforcements – Ambulance, cooks and clerks, Walking wounded.  
  1. 4. Lost  unit is moved 2d6 in random direction. Players selects unit 
  1. 5. Enemy spotted – closest hidden enemy unit visible for turn. Player may indicate closest to which friendly unit.   
  1. 6. German Counter Battery fire – remove one artillery counter from allied pool OR Mortar platoon is shelled. 
  1. 7. Battlefield smoke/covered moon – May force an enemy unit to re-roll vision distance 
  1. 8. Wireless failure – no unpinning or remounting for closest friendly pinned unit this turn. Ambulance cancels and allows standard morale roll.  
  1. 9. Lost  unit is moved 2d6 in random direction. Players selects unit 
  1. 10. Covered approach – unit may make immediate move 2d6 in a chosen direction, counts as in cover at end of movement. OR next turn 'Blitz' 4+1D6".  
  1. 11. Commander casualty – closest armoured vehicle immediately bailed OR closest Command or OP team pinned.  
  1. 12. Reinforcements – MG Section, 2 x 6 pdr, 1 x 17 pdr 
  1. 13. German Counter Battery – remove one artillery counter from allied pool OR Mortar platoon is shelled.   
  1. 14. Mechanical failure – closest vehicle is bailed.  
  1. 15. Lost  unit is moved 2d6 in random direction. Players selects unit 
  1. 16. Reinforcements – Carrier sectionInfantry platoon, Pioneers.  
  1. 17. Drifting smoke/covered moon – Umpire may force re-roll of vision distance when shooting at one German unit.  
  1. 18. Fire Support – allied artillery counter can be used without being 'spent' - remains in pile. OR may spend and call in a 25 pdr bombardment without rolling on artillery table.  
  1. 19. Lost  unit is moved 2d6 in random direction. Players selection. 
  1. 20. Choice of reinforcement OR increased motivation for player controlled forces.  

- Re-read the v4 Rules!!! I got caught out by a few things that I was mixing up with 3rd edition.

I think Martin had a good game - hopefully he felt a little pushed, even with his total glut of reinforcements and artillery!

On the other side of the hall, the chaps were going at Regiment Fire and Fury hammer and tongs!