Saturday 29 March 2014

Sherman I Hybrid conversion vs Battlefront Sherman IC

As I mentioned in a previous blog, just a few weeks after I completed my Sherman I hybrid conversion, Battlefront have released their Sherman IC model. Here's a quick comparison of pics.

Mine:


Versus theirs:


  • I don't think I did too bad! 

Monday 24 March 2014

Sherman ARV mk.1 (Part 1)

From one little project to another!

Part of the Armoured Squadron OOB is a Sherman Armoured Recovery Vehicle (ARV). I purchased one recently from Battlefront to round out my Squadron Command Troop. One of these:

Image care of http://www.flamesofwar.com/hobby.aspx?art_id=1545 - used without permission.

However... After buying this model I discovered by accident that it is wrong. The model represents a Sherman ARV mk.II - Which doesn't seem to have been produced in large numbers and which wasn't really used until the very end of 1944 - start of 1945.

The far more common ARV in British units was the Sherman ARM mk. I - as seen here:

Pic from wiki - used without permission

This was basically a turretless Sherman V with a front mounted jib for things like changing engines and gun mantlets. The removal of the turret lightened the vehicle and increased it's power to weight ratio. As it was not a 'front line' tank, it did not seem to have any of the extra 'applique' armor plates on the hull.

So here's the work of the last few days:

Jib arms, shovel and winch piece

Bits! Tank tracks, jerry cans, spare wheels, etc.


Base tank is a plastic (Open Fire!) Sherman with the armor plates on the hull removed. The white stuff is the filler used to plug the holes these terrible plastic kits seem to leave. Rear details come from plastic boxes from the old Open Fire StuG kits and a spare bit of laser cut wood. 


Adding the details! Front details with the rear hull detailed as well. This included some very fiddly 'wire' in the form of some string round the top of the hull.


Other side - with the top armor plate and hatch added. I'm not sure about the row of jerry cans on the back at this side. Opinions welcome!


So that's it so far. Not sure how I feel about this one - I think it will look better painted, but it might still need some work to tidy bits of it up!


Saturday 22 March 2014

Paint Table Saturday


A week or two ago I had seen Sofies Paint Blog and her Saturday Paint Table idea through TamsinP's Wargaming Girl blog. Since I've been working on my models this week, I decided to take part and put up what I've got on my painting desk this week.

So without further ado, my 4 x 15mm Plastic Soldier Company M5 Halftracks - for my Flames of War Highlander army. Alongside two painting/converting in progress jobs, a Plastic Soldier Company M5 Halftrack in the process of becoming an ambulance halftrack (for use in Battlegroup Overlord games), complete with tarp covered top. And a Battlefront plastic M4A4 (Sherman V) in the process of being converted into a Sherman ARV mk.1

The 4 halftracks are almost at the point of getting their coat of Armypainter Dark Tone Quickshade. 


Thursday 20 March 2014

15mm Sherman Hybrids Completed!

Finally, after several months, I've completed my troop of Sherman I Hybrids and my Sherman I Squadron command vehicle.

It's been a bit of a trek to get to this point, but I'm pretty pleased. At the same time pretty annoyed! On the Flames of War website just now they have a new release listed for April: a Sherman IC. Which is the Firefly version of the Hybrids I have been doing.

Ho Hum.

Anyway, here's some pics.


These tanks have been assigned numbers based on their position within C Squadron. The 3 Hybrids have been divided up between troops, with one in the Squadron HQ troop and the others scattered over the other troops in the Squadron.

I've started working on my Sherman ARV mk 1 conversion.  I'll try and take some pics as I go along with that. Progress continues on the M5 halftracks and my M5 halftrack ambulance. So all in all quite happy that I seem to be back on track!

Monday 10 March 2014

15mm M5 Halftrack Ambulance (Plastic Soldier Company)

One of my many ideas in progress has been to have some of the vehicles that are not typically modelled in 15mm - mainly to use in games of Battlegroup: Overlord.

One such idea has been to do a M5 Ambulance conversion from one of my (now spare) Plastic Soldier Company M5 Halftracks. The reason the model is spare is due to a change in the force chart for my Highlanders - previously the Pioneer unit had a M5A1 Halftrack for it's command team. However, in the D-Day allied book for Flames of War, this was changed to be a truck.

I'm going to use this newly spare Halftrack for my 17 Pounder A/T gun unit - meaning on of my PSC models is now free for me to try and be creative with.

I based this model loosely on this (yes, I know it's American!):

Photo care of: http://www.primeportal.net/apc/robert_de_craecker2/m3a1_white_halftrack_ambulance/
Having seen black and white pictures of such halftrack ambulances working with armoured units.

© IWM (B 7521)
So, starting with a M5:


I quickly decided that this wouldn't work - the struts were not tall enough and I needed a platform to model the green stuff on.


So I moved on to the above idea. This would give me the base I needed to do this:


As you can see, the struts along the top give the green stuff ridges to rise to. I started with working on the sides of the canvas canopy first, and then filled in the centre. For this I was greatly helped by the modelling tools loaned to me by Paul. Which I've had for months and never used - sorry Paul!

The final version (so far) is this:


The next step is to try and get a hold of some British style red crosses (I think Skytrex does some). Then see how the whole thing looks painted! Not sure what unit I will mark these up as - another area I will need to check out. Suggestions welcome.

Also in the works is a Ambulance Jeep - will see how that one goes as well!

Sunday 9 March 2014

15mm Sherman Hybrids WiP (Part 3)

Another of my projects that's turning into a never ending story!

In my last blog entry, I mentioned that I had decided to sort the decals on some of my vehicles. Some of my early vehicles has suffered from having 'silvering', and I had been loath to go back and do them. However, as I had decided to re-badge my Shermans as being part of 'C' Squadron, 144th Regiment, RAC I had gone ahead and fixed many of my Universal Carriers as well.

The Shermans were all changed during this process from having 'B' Squadron markings to 'C' Squadron markings.

Now, I caused myself a bit of a headache with this, as in my heart I had wanted to model 'C' Squadron from the start. The reason for this was that I know, by a process of elimination, that my Grandfather was either in the HQ Squadron or 'C' Squadron. The Regiments war dairy indicates that these were the only two units that were ones based in the part of Scotland that my Grandmother lived! However, I could not remember why I had chosen NOT to use the 'C' squadron markings origionally, and to use 'B' Squadron markings instead...

After I had swapped the decals over, I remembered.

My research has indicated that 144th Regiment, RAC had used Turret numbers - and it seems like many books seem to say these should be red. Remember the only pictures that exist are in black and white!


However, there has been some research done which indicates that the turret numbers color did not match the color of the AoS badge on the rear fender. This is known to be a red square with white numbers, without any doubt. The tone of the turret numbers in these black and white pictures does not match the red - nor does it match the white. The consensus is then, that as the second senior regiment (at the time of Totalise) the colour of the squadron markings would be yellow - and that the turret numbers were also yellow.

Sooooo.... where am I getting with this! I could not find any decals that had yellow numbers (of the correct size) and that would allow me to number the tanks as per 'C' Squadron. The only numbers I could find in Yellow were German ones from Doms Decals, and they would not allow me to do 'C' Squadron. A lot of digging the other night, however, turned up something that I think will work (fingers crossed!).

Some historical Info:

33rd AB Units 13/6/44 to 13/8/44:
Headquarters (172) - White squadron markings
1st Northamptonshire Yeomanry (173) - Red squadron markings
144th RAC (174) - Yellow squadron markings
148th RAC (175) - Blue squadron markings

Units 16/8/44 to 18/1/45
Headquarters (151) - White squadron markings
1st Northamptonshire Yeomanry (152) - Red squadron markings
East Riding Yeomanry (153) - Yellow squadron markings
144th RAC (154) - Blue squadron markings

Interestingly, many books have 144th Regiment, RAC leaving 33rd Armored Brigade in  August 1944, when in fact they just changed seniority from 2nd to 3rd regiment in the brigade.

Within the regiment the Squadrons had their own markings:

HQ Squadron - diamond

A Squadron - triangle
B Squadron - square
C Squadron - circle

And the 144th Regiment, RAC used the following turret marking range:

Recon Troop (M3A1 Stuarts) 1 to 11
AA Troop(AA Crusaders) 12 to 17
Regt. HQ.(Sherman I's) 20 to 23
A Sqnd. (Shermans I's) 30 to 49
B Sqnd. ( Ditto. ) 50 to 69
C Sqnd. ( Ditto. ) 70 to 89
Allocated for spares 18 to 19 and 24 to 29.

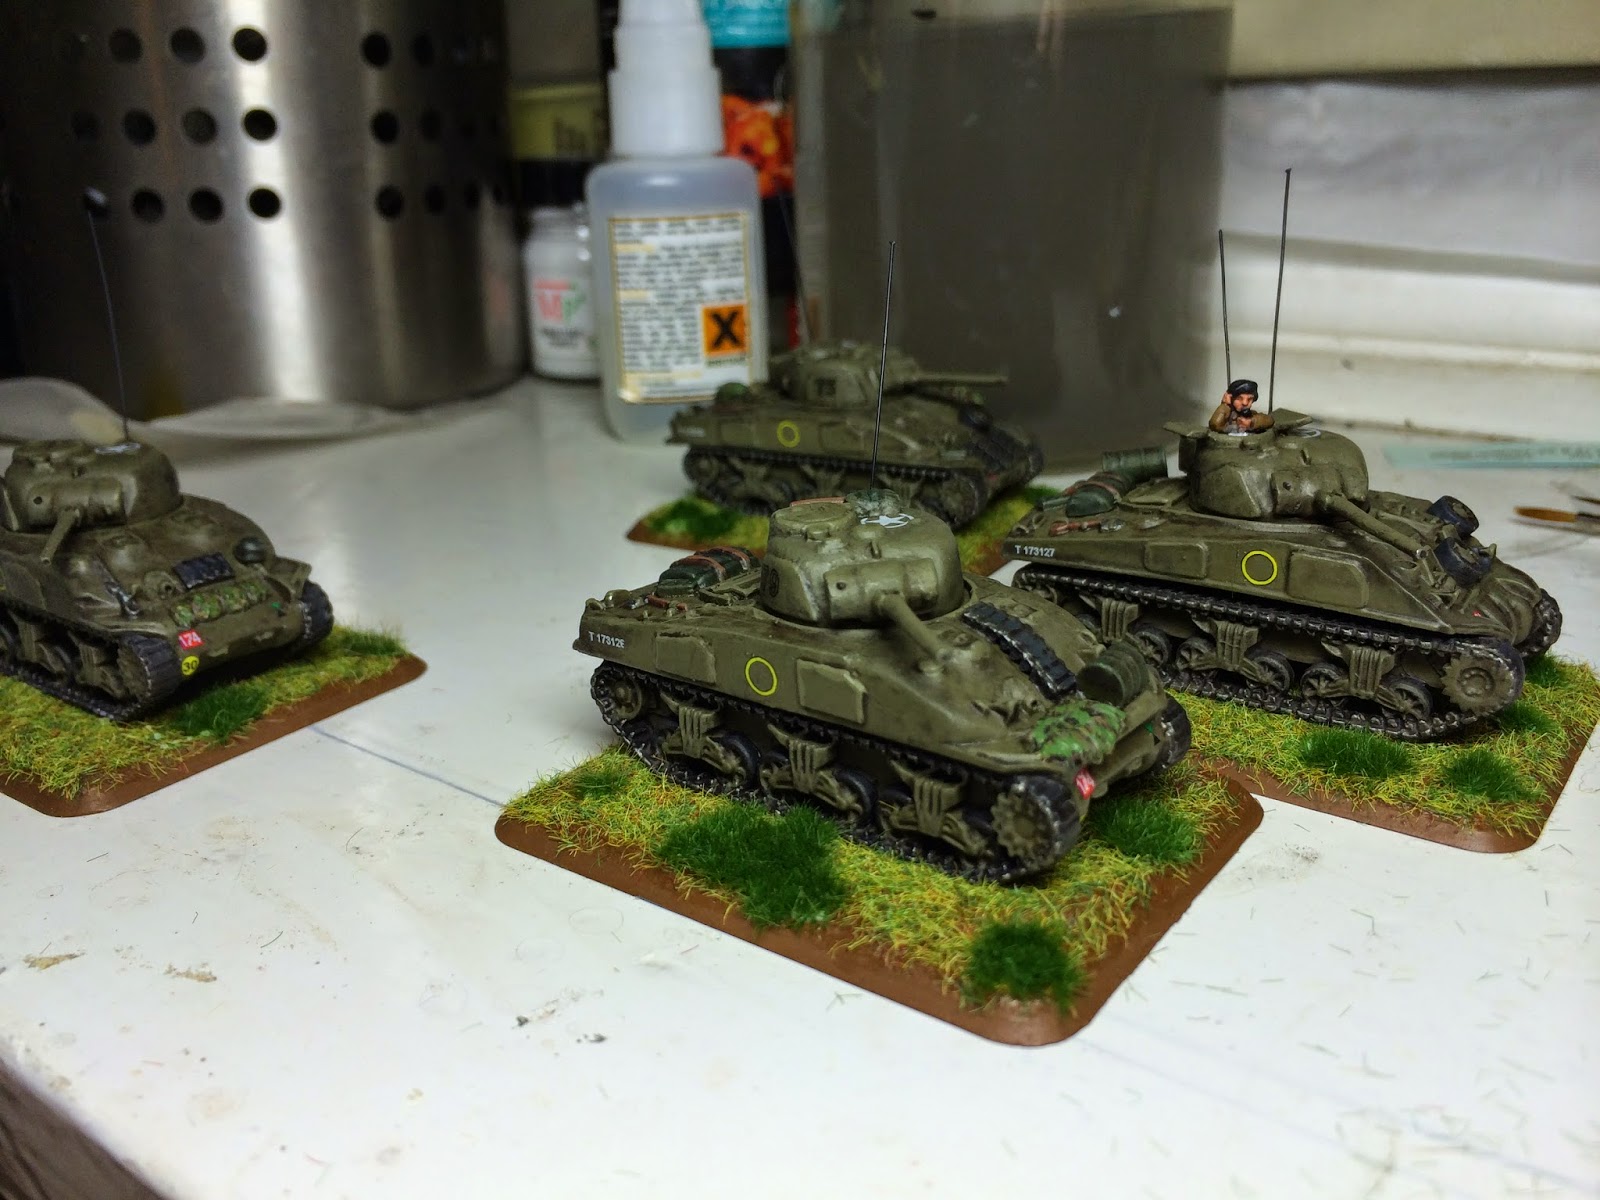
And finally, some pics of the 4 tanks awaiting turret numbers and a matt varnish.

Sherman I closest to the camera, with the three converted Hybrids further away.
Sherman I Hybrids - note the AoS says 124 - this will be altered to be 174
One of the things I would have liked to change was that the Hybrids all came with turret hatches that seemed to be part of the turret casting. One of these will be a Squadron HQ tank, but will only have the 2 aerials to distinguish it.
Sherman I - soon to be one of the Squadron HQ models (hatch open).
Sherman I Hybrids bearing 'C' Squadron markings


Thursday 6 March 2014

Two steps back...

As part of my ongoing work, I've ended up going back over previously completed models.

These guys got a new highlight and Mickey Mouse camo on the trucks. 


The last photo shows my rather bodged repair on the left hand truck. The infantry figures all had a highlight.