Sunday 23 April 2017

Terrain Progress!

Hi Folks,

Lots of blog posts this weekend, as a few different things have popped up.

While some lucky people got to go to Salute yesterday and see/buy lots of nice things, I was out in the garden getting covered in PVA and static grass. Yet another battle in my fight to upgrade my battlefields and make all the time and effort spent painting models be reflected in the quality of the gaming table I (plan to) own!

I have, I accept, a long way to go. But even the last few days has shown progress can be made.

Yesterdays efforts started with some work being done to my GF9 'Battlefield in a box' terrain. Specifically my various road sections:


I've added the static grass I use for my standard basing to the dirt tracks (perhaps a little too heavily...) and to the edges of the cobbled sections. I'm thinking of doing a little work to the crater sections to have them match the craters in my minefields. A coat of German Camo Medium brown, a drybrush of beige brown and then a very light drybrush of Buff might do the trick! I'll have a think on it as they are really OK as they are. I'm also thinking of adding the usual tufts and flowers...

I also turned them over and sprayed the undersides with Matt varnish. I've had issues with them sticking together in places and causing damage due to this. I think it was because some of the resin was showing through the paint, so I'm hoping a coat of varnish will sort that out!

I also got my minefields finished - some step by step pictures:

Starting with 2" by 8" MDF 'tablets' from East Riding Miniatures, adding some of the Vallejo 'Brown Earth' Texture with some finger applied craters... Just adding circular swirls with a finger tip helped, but the craters were not very pronounced. 

Using some Milliput to build up the craters once the resin was dry. Wetting your fingers helps get it nice and smooth. I applied a sausage of Milliput in the area I wanted, making it into a donut. Then wet my finger and pressed it outwards to slope the edges. I then made the crater hole with my finger, and smoothed it outwards again. 

Adding some fine sand to the top of the craters, to give texture. I used PVA for this. I then painted them German Cam Med Brown (Vallejo 826), drybrushed Beige Brown (875) and then a very very light drybrush of Buff '976). Followed by the usual PVA and static grass + tufts. 

My 4 'breached' minefield markers, shown here being carefully negotiated by a Polish Sherman V. Rather than removing cleared minefields, I'll replace them with one of these markers. The 'white tape' is some thick thread painted ivory. The idea had been to have the ground a little more beaten up from the Flail passing - I may revisit these. Attacking the static grass with a modelling tool may suffice. 

Another view of the 'breached' minefields together. Note that the basing for the minefields matches that of the tank! I'll have a look at what signage might be appropriate for a cleared lane, just to make make it clear what these represent. 

And the 4 separated out. 

8 unmarked minefields. I may try to do signs for these, but then I might just mix in the others with the signs. The craters were just to add some variety - they are probably more shell craters than mine craters. I discussed it on some of the chats with the guys and I'm really uncomfortable about modelling victims. Dead cows were mentioned... but in the end I left them a bit 'plain'. 

'Clean' Minefields but with signage. I've 6 of these. 
So a total of 18 Minefield markers in one form or another. Oddly, with the completion of these I have actually totally finished a planned army. My German Grenadiers needed some minefields to go with their MG bunkers!

Then, I did a little more work on my ruined houses. Mainly getting the roof colours to match, painting doors and doing other small bits of detailing. I've marked the bottom of the various ruin sections and houses with the building number and the level of the building the ruin marker is for.

Repainted roof, added some more rubble detail. Painted doors. The other side of the building looks undamaged, and is actually a shop front. I added some colour to the shop fittings and front doors as well. 


Repainted the undamaged side of house, and roof. I've another building like this so wanted to make them different. Painted doors and window details. 

Repainting the roof also meant that some of the rubble bits were a different shade, so I gave them a quick running over in order to have it all match. 

Repainted the roof (it was red) and added the detail to the two rubble piles outside this building. I also added the cork rubble to the damaged walls and internal rubble sections. Gluing small patches of the cork rubble to visible floors helps the rubble piles merge in a bit. 

I gave the roof here another coat after looking at this picture. The 'cuts' in the MDF really soak in paint! Painting the roofs also make some of the assembly pegs less visible. 

Other side of the same building, showing damage to the interior and the larger rubble pile. All this damage is removable. The internal sections can be moved into the undamaged rooms in the house for ease of transport. The rubble piles also fit into the 1st floor. 

View from above. Close inspection makes the rubble look a bit out of place, I think. But the impression that the piles make on the table works really really well. I think it's important to match the colours to the building as well. 

Closer shot - you can see the painted doors here - I didn't do much more other than paint the roof. There is a question over painting the cork rubble - but I am just going to leave it. I think it looks OK at tabletop distances the colour that it is. I could try to paint it the same brick red as the building, but I think it would look too stark. 

Lastly, I finished off the Telegraph poles.


I added a 25mm base to the bottom of these, and milliputted around the give weight and make the surface a little smoother. I've another 9 of these to build. Transport for these is a issue as they are fragile. I'm thinking of using the same technique as my vehicles and magnetising the bases to stand upright, but they are taller than most of the boxes I have. The transport of the buildings offers the same issue!

I also started work on my fields. These are fairly iconic for the Normandy fighting, I think. I totally appreciate that my based tanks are going to look weird sitting on top of this stuff, but that's just one of the issues with any sort of basing. I've got a LOT of this stuff to do....

These were cut from an Ikea door mat. The backing material was a rather stark white - 'Matt Varnish', one of our Paint and Chat contributors, suggested using an ink on it. As it turns out the Vallejo 'dipping formula' Sepia Shade works really well! I also found that applying liberally to the backing and the bottom of the 'crops' looks good. I trimmed up the edges with my trusty 'basing scissors' to tidy them up. I also took Matt's advice and give the top of the sides and the top surface a liberal dry brushing with 'Buff' paint. 

One thing I did find - I have been using some purchased resin rubble piles for the larger sections at the sides of my buildings, but had some milliput spare the other night. I clipped off some of the building sprues and found this made and excellent base to build on with the milliput. So if your thinking of doing your own ruins, that might be a cheaper way of building up the height you need:

A clipping from the 4Ground sprue, with milliput applied. It doesn't look much now, but once I detail up the surface with more sprue and cork rubble, it will fit right in!
This week will be final prep for the game next Sunday. Phase II of the Battle of Noyers! I've mainly admin to do, sorting out of forces for transport, printing unit details, etc. I'm trying to do handouts in the v4 style, which show all the unit stats, dice rolls, etc.

I'll try to get some more fields sorted, as these will help clutter up the map space. I'll also see what buildings I am taking and what work needs done to them. This will, currently, mainly be roof painting I think.

Thanks for all the positive feedback guys, hints and tips are always appreciated!

Friday 21 April 2017

FoW v4 AAR: The Battle for Noyers, Phase 1

Hi folks,

On Easter Monday I headed over to StiGs for a quick, introductory, game of version 4 Flames of War. Also taking part was Stu, who had never played FoW before. On the 30th of April I'm laying on a large scale FoW v4 game at the club, so wanted to use this game as an opportunity to test out the theory (and the new rules) in a trial scenario.

I decided to go for the Battle of Noyers (Operation Pomegranate), one of the diversionary attacks put in by the allied armies immediately before Operation Goodwood. As usual, I went with something that has a personal connection - this was the first battle that 33rd Armoured Brigade fought as a unit following it's arrival in Normandy. The other benefits of using this battle as a scenario is that there were two phases to the battle. This meant I could do a trial game with StiG and Stu before the main event, and have it impact on the game on the 30th.

As an intro game, and a scenario, I decided to use a few special rules. However, we stuck to the v4 rules for everything with the exception of three main points:

1.  Hidden German deployment. The Germans were controlled by myself as umpire and were deployed at the beginning of the game via a sketch map.

2.  Preparatory bombardment. The allied players each for a bombardment template at the start of the game, which left a ranged in marker. This was relevant as one of these templates was directly on a German position. Artillery was off table and available via a different mechanic..

3.  Tiddly Winks... Over the board, at points I deemed to be tactically significant (gaps in hedges, narrow points of the roads, forests and corn fields, etc) I scattered small green counters. These counters, on being approached by allied units, would generate a D20 roll on a random events table. These events ranged from positive events - such as 'covered approach' which allowed the unit to move 2d6 and be in cover at the end of that movement, or Ambulance Jeep, which brought on an ambulance jeep which would allow an auto unpin for a unit it was near. On the other hand, there were negatives - such as a random sniper shot against a unit (including armour - the commander was being sniped), German reinforcements or - mainly - minefields in Ambush! Artillery was also available (for both sides) through this method, but neither side rolled for artillery support.

This combination of hidden deployment and random events seemed to go down very well with the players. StiG stated that he thought it was one of the best games of FoW he had played, which I take as a massive compliment. Both players approached the game carefully and tactically and there were some great, thematic, random events. Like both times the corn fields were entered resulted in the 'covered approach' roll, allowing units to appear at the edge of the corn in one move. Or the unit emerging from the corn into an orchard rolling the 'lost' event, and ending up 2d6 away in a random direction and emerging onto the parallel road. The most common event, however, was 'minefield'. This was deliberate, as I had seeded this event into the table several times to reflect the history of the battle. Basically the allied forces had been promised that friendly minefields had been lifted or gapped for them, only to find out they had not been. As a result, from one Squadron of 18 tanks, only 7 made it to the enemy positions - largely down to 'friendly' minefields!

I'll be using a different table to roll on during the next game, so for your enjoyment, here is what I used:

Battlefield Events 

  1. Ambush minefield – skill test to avoid (4+)  
  1. Wireless failure – no unpinning or remounting for one unit this turn – umpires selection 
  1. Reinforcements – Sherman Crabs (if already on table, roll again) 
  1. Artillery support available (off table) - 1 battery of 4 x 25 Pounders. Must be used in same turn, if no spotter then previous ranged in marker used. May lay smoke.  
  1. German DF point – mortar bombardment on location of counter 
  1. Ambush Minefield – skill test to avoid (4+) 
  1. Battlefield smoke – unit counts as concealed for turn 
  1. Field ambulance available (can be held till needed, immediately unpins one platoon) 
  1. German Armour – StuG reinforcements arrive 
  1. Covered approach – unit may move 2d6 in a chosen direction, counts as in cover at end of movement.  
  1. Commander casualty – closest armored vehicle immediately bailed 
  1. Ambush minefield – skill test to avoid 
  1. Reinforcements – Crocodiles (if already on table, roll again)  
  1. Enemy spotted – hidden enemy unit visible for turn.  
  1. Artillery support available (off table) - 1 battery of 4 x 25 Pounders. Must be used in same turn, if no spotter then previous ranged in marker used. May lay smoke.  
  1. Sniper – enemy sniper shot against unit. 
  1. Battlefield smoke – unit counts as concealed for turn 
  1. Ambush minefield – skill test to avoid (4+) 
  1. Lost – unit randomly moved 2d6 in random direction 
  1. Covered approach – unit may move 2d6 in a chosen direction, counts as in cover at end of movement. 


Brits deploying and the long view up the table. Objectives there the three 'lines' up from the nearest cornfield. With line 1 being the hedgerow, line 2 the orchard and line 3 at the rear of the hamlet. 

Somewhere, Germans lurk...

Allied forces start rolling forward, with the friendly minefields to their front, and the 'cleared' spaces. Note the tiddly wink next to the hedge. 

Rapidly, the allied advance ran into minefields. Quite a lot of minefields, especially in front of StiGs platoon of the 1/6th South Staffs.

Ranged in markers and craters marking where the initial bombardment landed. 

StiGs infantry (on the right) had to clear several minefields to let his tanks advance. Minefield rules have now been well and truly clarified for next game!

Shermans breaching the hedgeline. I wonder what that tiddly wink could be... a Minefield!
As the allies advanced, the Germans held their fire, waiting for clear lines of fire (or trying to unpin)!

Stu's careful armour advance, avoiding the road... The marker on the road would turn out to be... a minefield!

StiG running into more minefields! but they were still enjoying rolling the D20. 


The first Pak40, having unpinned, takes some shots and some of Stu's infantry on the road (the only target it could see). Both teams died, but the German forward line was established. Or was it!

The German Pak40, despite being dug in and having a 3+ save, it fell to 75mm fire from the Shermans. 

Stu encounters another hidden gun, losing a Firefly in the following turn. StiGs forces circumvent the minefields and try to keep up!

The Firefly commander scans the ridge carefully... he thought he saw movement, but it must have been a rabbit.
Stu's platoon reaches the edge of the corn field, to find themselves face to face with a dug in German infantry platoon. Concentrated MG42 fire would soon wipe out this half of the platoon (another slight variation from the rules, Stu had the company commander with the rest of the platoon, so we judged that it would stick around under his command till the platoon commander got back in command range). 

The StuGs make their presence known... for the allies some Crocodiles and Sherman Crabs turned up. 

The Crabs chose to operate out of command - a dodgy move if they had taken casualties, but it fitted the scenario. 
A German Sniper team in the corn, soon to be pinned and assaulted - no prisoners were taken! The Sherman on the road would fall to a Pak40 shot from the hedgerow beyond the corn field. 

Ambulance jeep, prior to being run off the road by HMG42 fire from the green building. 

Burning firefly (using my new smoke marker)
The battle rages. Stu's surviving infantry flank the village while his armour moves up. StiGs armour and infantry get bogged down in the corn field, losing a Sherman to the Pak40. The infantry platoon would get hit hard by MG42 fire. 

British armour dashes up the road to support - including the Crocodile, which would burn a lot of the Germans from their buildings. A duel was ongoing on the left between Stu's armour and the left most Pak40. The Pak would eventually lose. 

A StuG and Pak40 trade long range fire with StiG's crocodile. But that front armour of 13 bounces it all. 

Close up of the StuG on Sherman action...

Allied armour enters the town. A German assault from the buildings is seen off with no casualties on either side. Then the Croc gets in range and 5D6 dice worth of flamethrower (causing re-rolls on successful saves) empties the buildings of German units. On the other flank, the other Croc does the same. The last surviving German squad surrenders, and Phase II is read to go!


I really enjoyed running the game, and I hope I can run something as fun on the 30th! The table looked great, and it was really good to get my terrain out again. Need more hedges and stuff, but I was happy with the look.

How did v4 play? I think StiG summed it up best. He has played v1, 2, 3 and now v4. His comment was that "It's Flames of War, it just plays more smoothly. But it's definitely Flames of War.". I would 100% agree - this was very much a FoW game, even with my little tweaks. I'm a strong believer that the rules can be used as a framework for playing historical games. I think what we played was a fun, fast and tactical game based very much on a historical scenario. To me, it reflected the outcome of the actual battle - and that is key to me. Any rules should reflect the outcome you expect.

I'll get pictures and stuff from the game on the 30th,

Saturday 15 April 2017

4Ground Buildings - I ruined them!

Hi folks,

Bit of a play on words for the title - clickbait, almost!

So last week I had posted about my progress in building MDF buildings, the majority of which have been from 4Ground. I did a 
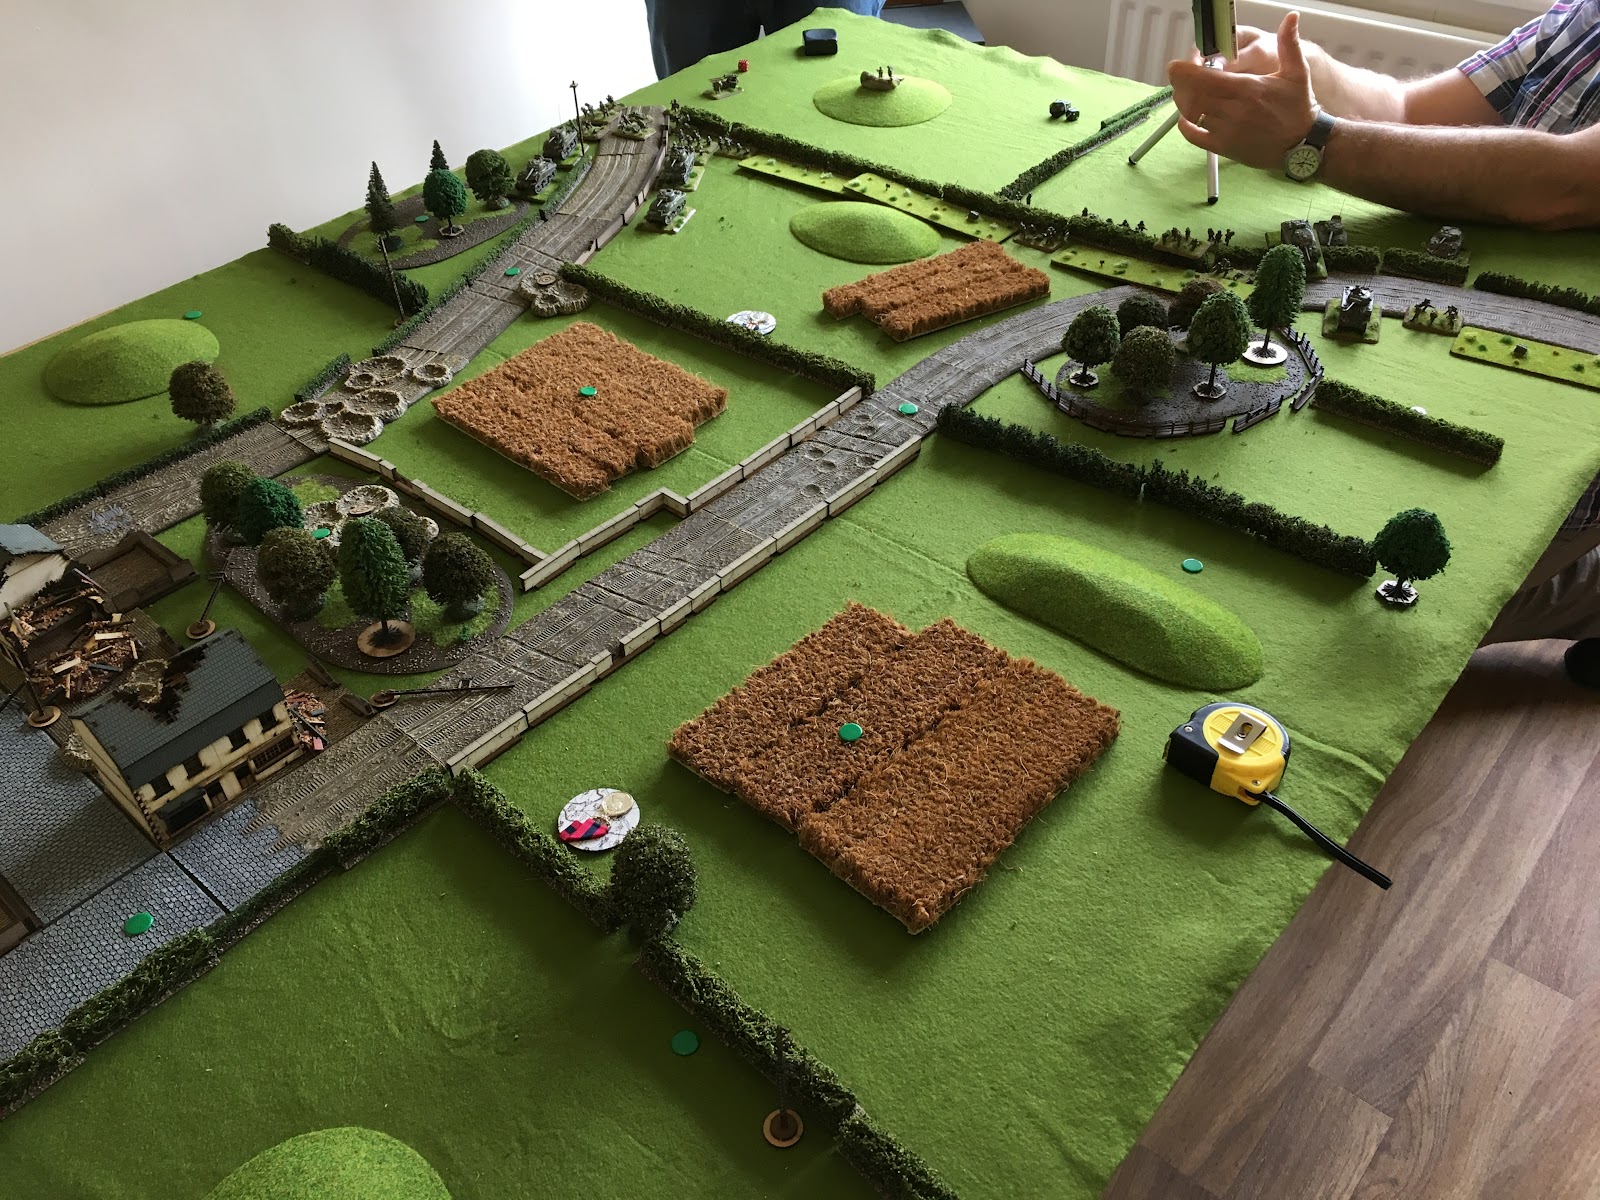
little video yesterday showing off the buildings I have finished, laid out in a sample town setup. This was just to help me visualise what I had, and what I wanted to do with what I already have.

Some pics I took at the time:


You can see in the last picture the scattering of ruined 4Ground buildings I have assembled. One of my aims for these is to make them look actually ruined while still retaining their ability to be used on the table and moved around between games.

I set about doing some experimenting with my first victim. Aided by a delivery of 15mm rubble piles from Total Battle Miniatures (which I'll review on their own in a while) I picked one of the buildings I foresaw I'd be having the most issues with, and got to work.
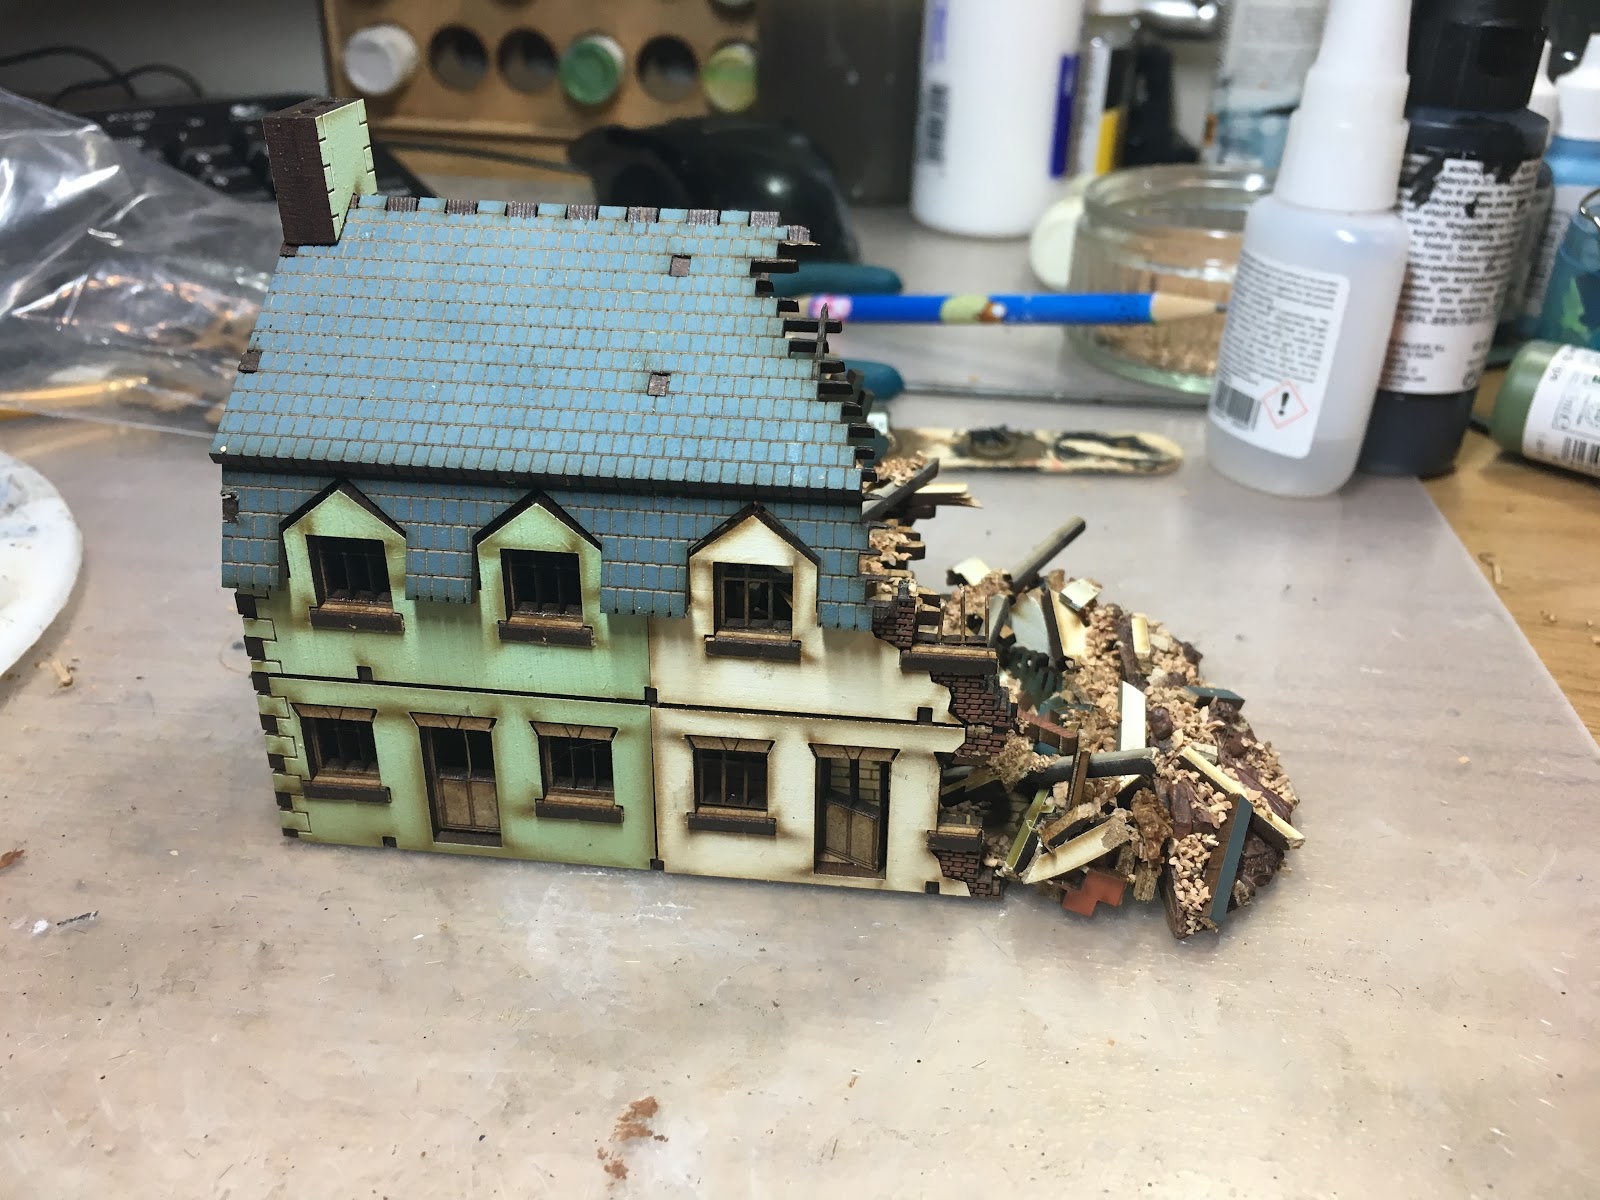
Victim #1:


A nice 'clean' ruined building. I'm not too bothered with the cleanliness of the colours, more the cleanliness of the ruined sections. The non straight line along the edge of the building would cause me issues for the newly aquired resin rubble piles - which have straight edges. So that edge needed straightening out. I thought about using various materials to do this, before realising that the bottom level of the house came from a 'push out' MDF sprue - which had the matching line on the sprue.

So, a little while later...


Now, the above picture has the cork rubble piled on while it dries. The cork rubble came from  'Serious Play' and s the only thing I've used other than some PVA and superglue that didn't come from the 4Ground building sprues.

I cut up bits of the sprues, picking the colours that match the building and layering them up to get the depth I wanted. For the 'end' of the house, I used the matching shaped sprue, and used other off-cuts to build up a wall shape then pile 'rubble' on top. The upper level used a similar process, putting the relevant shapes on and then using superglue to build up layers - without gluing the rubble to the floor.


I was happy with this, but still a little unhappy at the 'cleanliness' of the lower floor and of the resin rubble pile. So I set to work again.

A little while later, I had this:


I glued down some of the cork rubble onto the floors, as it does no harm and adds to the look. The resin base I put some bits of sprues on and then some of the cork rubble to fill in the spaces. Prior to this I had painted it brown with some rough bits and bobs painted similar colours to the building.

As you can see, the rubble is all removable, allowing the space to be used for figures.

I also made a similar attempt with another building. This one with a hole in the roof and damage descending through the house.


These small piles of rubble are also all removable, and the resin pile outside has now had the same treatment as the other one - painted, some colours blocked in then off cuts of building sprue glued on along with patches of cork rubble.

I'm really pleased with these, and I intend to progress with the other 3 buildings later on this week.

Also in the work pile has been some of my minefields. I'm waiting on some materials arriving to build up the edges of the cratered sections, so in the mean time did my 'clean' minefields.


The small minefield signs I made using some cut up sections of... you guessed it - the thinner bits of MDF building sprues. I used some plastic covered paperclips for the posts. The other minefield marker came from a pack of Royal Engineers I have for my Brits. I decided not to do any visible mines, but used some 'dead grass' tufts to show that there is perhaps something under the soil... I think visible mines would be a bit pointless to be honest.

I've 6 of these done now, with another 12 or so to do once I can finish the craters off.

the other immediate task I have is a whole lot of static grassing for edges of roads, rails, walls and fences...

Till next time!