Sunday, 3 July 2016

My Basing!

Hi Folks,

I spoke about doing a post on this a while ago, but it got put on the back burner and forgotten about. I get a lot of compliments on the basing of my models, and a few of the guys have asked me what I do. There isn't anything really unique about this technique. It's basically applying static grass to the base, then tarting it up with flowers and tufts!

Anyway, a while back I did a little video to show some of what I do, along with some pictures.

1.  Prepare the bases (and count you have the correct number!). For the Flames of War bases this is quick - I generally just trim along the bottom edges just to make sure there is no flash or anything here. I also make sure the edge where they base has been attached to the sprue is nice and clean. Normally I would just use a scalpel for this.


As I put acrylic resin on the bases before I put any models on, I also score the surface of the base. I used to do this by scratching a zig zag pattern in 2 different directions on the surface, but recently I came up with a quicker way of doing this. I have a very fine toothed saw (like a hacksaw, but with slightly more raised teeth) and I drag this over the base in 2 directions. Much quicker and safer!

2.  Applies to the way I base my mini's. I dislike the idea of putting basing medium near finished minis, as I will get it all over them. As such I put the medium on the bases and then cut holes in it once it's dry. The Acrylic Resin I use just peels off and leaves a nice space for the infantry figures to be glued to the base directly. The trick is getting the resin to a decent depth so that the bases are not pronounced. This method is probably more time consuming that others.

Apply the resin to the surface of the base. I have used a small spoon for this in the past, but recently started using a small 'pallet knife' I got from a painting supplies shop. I believe it's purpose is for mixing oil paints? It allows me to put the resin on the base and then spread it around. At this point I don't worry about the resin being in the wrong place, so long as the base is covered.

3.  Once the resin is dry, using a scalpel I cut off the excess. Once this is done, the base should look like this:


4.  A apply a coat of by basing colour. For my FoW stuff I use 'Flat Earth' (Vallejo Model Color 143 (70.983))


The trick here is just to put a good dollop of paint directly onto the base, and then use a rubbish but big brush just to make sure the base is covered.

This paint is actually one I go through most of - followed by English Uniform and Russian Uniform (my Infantry and Tank base colours!).

5.  Once dry, put a dollop of PVA onto the base, and again use a poor quality brush to cover the top surface. I try to avoid getting any on the beveled edges, but if I do, it's no big deal.


6.  Apply the static grass! I use a 'Spring meadow blend' which seems to be a mix of the common 'spring' and 'summer' static grasses. For the 15mm models I think it's a 2mm length grass. I would caution you - if your planning on doing a big army, and want the basing to be the same, take a note of which make and colour you use, else you could end up with variation over the army...

Video of the application process can be found here:


But basically I use a washing up liquid (Dish Soap?) bottle with the stopper removed. this is filled with the grass and given a good shake before use! A funnel of some sort is very useful for getting the static grass into the bottle. You will also need a tub to put the bases in while you squirt them, in order to not be quite so messy. And to be able to retrieve the grass that didn't end up on the base!

7.  Once the grass is on, and the whole thing is dried, the base looks like this:


As you can see, the grass is stuck to the sides and is generally a bit scruffy.

What I do next is take a scalpel and carefully cut along the top of the beveled edges. I then use the same scalpel to carefully scrape the glue and grass from the sides of the base. When I'm done, it looks like this:


Better, but still scruffy!

My next step is to take a small pair of scissors - actually nail scissors I picked up for 99p in a super market - oh, the looks A gives me when I turn up with 'random' things for the shopping basket! I use the scissors to do some 15mm landscaping... generally trimming the grass along the top edge and surface. Just to make sure everything is a similar length, etc. It should end up looking like this:


Neater!

8.  Touch up the sides of the base with Flat Earth again (I also sometimes do the bases without painting the sides before I apply the grass, to save a little time and paint. However most times I forget!). The end result looks like this:


If you want to, at this stage you could also give the flat earth sections a coat or two of varnish - although I rarely do.

So that's the basic's of how I get the grass on. The rest is simple - for this base I glued a model directly onto the surface by applying superglue to the underside of the tracks and pressing down until it was fixed in place.

The pick what tufts you want to use. I aim to put 8 per base on - 2 each of White and Yellow flowers (Mininatur 726-21 S 'Tufts with Blossom Spring') , short tufts (Mininatur 717-22 S 'Short Tufts Summer') and long tufts (Mininatur 717-22 S 'Long Early Fall'). I apply these by dabbing some superglue on the base where I want it. The tip for this is to glue the model onto the base first!

As to which tufts to use - there are any number of styles of these, and it's just about picking the style that suits your army. Tufts can be used to unify the army, or to mark out different types of bases (use purple flowers on commend bases, or one platoon uses all one colour, etc).

This particular base went on to become:


I also use my little scissors to trim the tufts as well, just to make sure they are neat - 15mm landscaping!

The very last thing I do with my bases is apply some thin 'steel paper' to the underside, so that the bases stick to the magnetic sheeting I use for my storage.

And thats it! Thanks to Bob for getting on my case about this tutorial!

Tuesday, 28 June 2016

Team Yankee: 6mm Heroics and Ross vs Scotia comparison

Hi folks,

Alongside my 3mm Cold War project, I'm trying to decide which way to go for a 6mm Team Yankee force.

Currently, I would love to go for GHQ - who's models are stunning but pricey. Still cheaper than buying 15mm models, but expensive for the size! Other options are Heroics and Ross or Scotia.

I've seen a lot of mixed reviews about both of these manufacturers, so decided to invest a small amount in samples from both. So I picked up most of the 'core' vehicles from each manufacturer. I figured others might find these pictures useful. First up we have the M1.

I actually have a single M1A1(?) Abrams from GHQ to show with the two 'slick' M1's from H&R and Scotia. In these pictures the order is: GHQ, H&R, Scotia - unless otherwise stated. 

GHQ, H&R, Scotia

GHQ, H&R, Scotia

GHQ, H&R, Scotia

GHQ, H&R, Scotia

Scotia at the bottom and H&R at the top

Scotia closest to the camera

Scotia on left, H&R on right.

Scotia on left, H&R on right

Scotia on left, H&R on right

GHQ, H&R, Scotia

GHQ, H&R, Scotia

My own thoughts were than I prefer the Scotia sculpt. Slightly more detail on the hull, better looking tracks and while the turret is smaller it looks better proportioned. the MG's are also included on the turret.

Next up, T72. No GHQ comparison for this one:

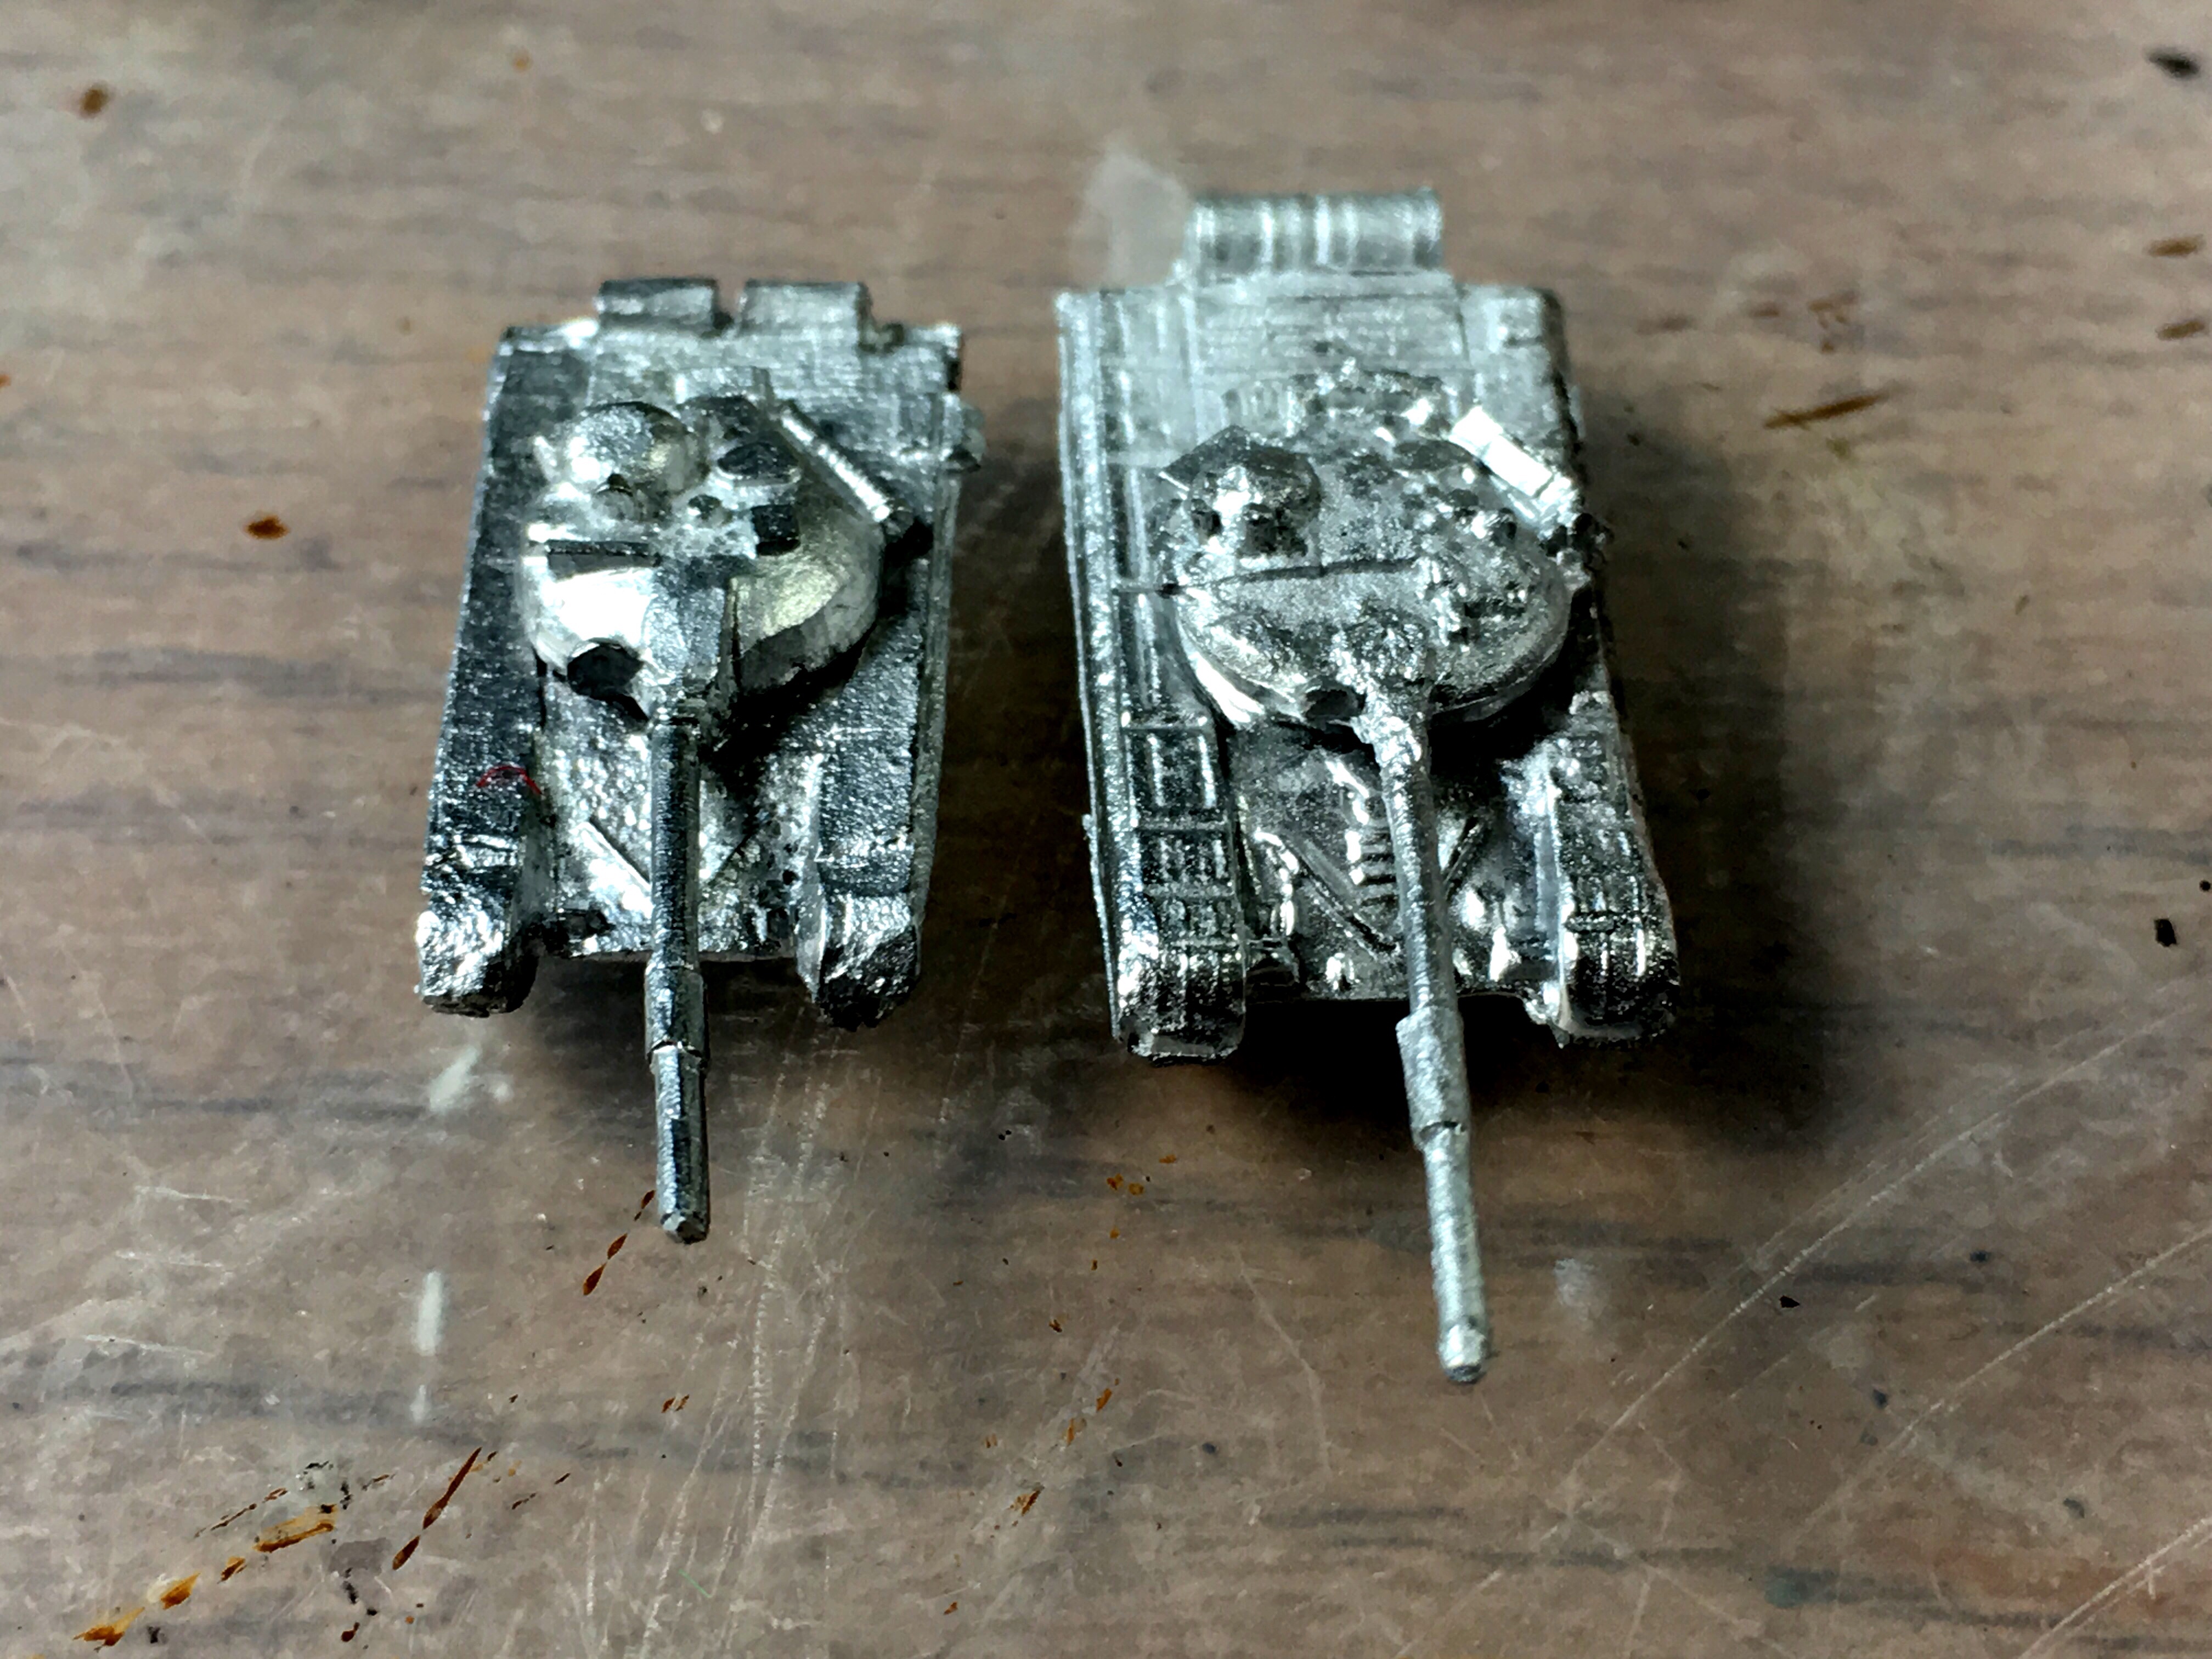
H&R on left, Scotia on right

H&R on left, Scotia on right

H&R on left, Scotia on right

H&R closest to the camera

H&R on bottom, Scotia on top


The Scotia T-72 is much better both is size and quality. You can see a real different when comparing them to the M1. I know the T-72 is supposed to be smaller, but the H&R one is much much smaller. 

Then BMP1's and M113's and M901's. The major difference is that the 'Hammerhead' turret is separate on the H&R model.:

H&R on left, Scotia on right

Scotia closest to camera

H&R on left, Scotia on right

H&R on left, Scotia on right

H&R on left, Scotia on right

H&R on left, Scotia on right

H&R on left, Scotia on right

H&R on left, Scotia on right

H&R on left, Scotia on right - loose turret on the Scotia model

The Scotia BMP1 is much nicer, and has a pose-able turret. The turret also seems to sit in the correct position on the vehicle, with the H&R sculpt turret being too far forward.

The Scotia M113 is not as tall and a little wider - it reminds me much more of a Space Marine Rhino.... which probably means it's closer to an actual M113.

My own preference is for the Scotia one here, the detail on the turret is better, even although it is cast onto the model.

I also got a Mi-24 Hind, although I think in this case the H&R helicopter is better. The H&R A-10 is also nice, but Scotia does not seem to do any. The decision on whether to go for GHQ is a big one. The difference in price is £8.40 for 5 tanks compared to £2.50 for 5... The argument is really over the quality versus the cost! At the same time, H&R Helicopters and Aircraft may be the way to go. 

I also picked up some H&R 6mm Infantry, which were lovely models. I'll be going with their infantry packs when I do got for 6mm. I've already got some half size MDF bases which should translate into 6mm without any problems.

All that's left is for me to make a decision on what to do!

Friday, 24 June 2016

Team Yankee: Afghansty review

Hi Folks,

So with me dipping my toes into Team Yankee - although not in 15mm, check out this video I made yesterday here detailing a quick game of 3mm Team Yankee:


Anyway, with my interest in the game, I decided to pick up the Team Yankee: Afghansty. Having checked prices and such, I was tempted to get the digital copy on my Ipad and then order the printed cards. However I also checked the Flames of War online store - and the printed copy with cards was actually cheaper with free postage than the Ipad version.

The book arrived within a couple of days, and included the unit cards.


The book itself is only 12 pages (including the back page) and includes:

A page briefly detailing Soviet involvement in Afghanistan and the VDV as well as Soviet Air Assault tactics and how they would be Incorporated in a 'hot' war in Europe.

The standard army list diagram, showing the Air Assault Battalion and higher level support options. As well as the Air Assault Special rule:

"An Air Assault unit can only be held in reserve if all other units deployed on table are Air Assault units."

Basically, the way the army list works is that it is assumed the troops have already been dropped on the objective, and the aim of the NATO troops is to smash the VDV forces before the 'Main Body' of Soviet troops can reach and relieve them. As such, the army does not include enough helicopters to transport the whole army!

The base Air Assault list is A Battalion HQ with a min of two (max of three) Air Assault Companies and a similar number of Hind Helicopter Companies (with 4 helicopters in each).


Air Assault Infantry companies have the same weapon options as Motor Rifle companies, but seem to be slightly better in close combat, with a Skill of 4+ and Assault of 4+ (as opposed to 5+ for the MR company), counter attacking on a 3+ (the same as a MR company). The company does have the option to take some different heavy weapon upgrades. These include AGS-17 teams (Automatic Grenade Launchers) with a RoF of 9 halted and 3 moving, AT3 and FP6. As well as AT-4 Spigot ATGW teams (RoF 3 Halted, AT19 and FP3+).

Beyond this, the rest of the army list (support options) are the same as those for the army list in the main Team Yankee rule book.

The booklet gives a short painting and basing guide:


The cards seem to be decent quality and include:

- 1x Afghansty Airmobile Brigade force Card
- 1x Afghansty Air Assault Battalion HQ Card
- 3x Afghansty Air Assault Company Heavy Weapon Cards
- 3x Afghansty Mi-24 Hind Assault Helicopter Company Cards

The Brigade force card has on the back of it a list of the various special orders that all units can be issued (I've no idea if other TY cards have the same).

Overall I was happy with the quality of the product and the delivery time. I do feel that it's perhaps not worth £8 - I think £6 would have been a more reasonable price for what you get.

The army list doesn't seem to be hugely different from the main Motor Rifle lists, although there is the option for a lot more helicopters. I suppose it may signal the way Battlefront want to approach the introduction of new armies. Only a single blister of VDV heavy weapons needed to be produced for this list to work. Similarly, how much would be required to do a US Armoured Cav list or other similar divergent list from the main ones.

For my own projects, this army should be easy to do with both 3mm and 6mm troops!