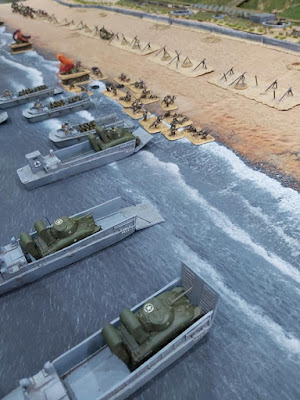
Work on the last 5 British Armoured Cars continues. In the mean time I thought I'd share a few pictures of a Zoom game I participated in on 6 June.
Dave was kind enough to take some action shots with my LCA's which had been loaned for the occasion.
This zoom game was hosted by Dave, as a small replacement for the much larger game we had planned to do last weekend. Myself and Martin were controlling the landing troops, with orders to clear the beach.
Dave had beefed up the defences slightly, and we applied a few modifications to the standard FoW rules. For a start, troops on the beach only had 4+ saves (instead of 3+), and weapons could fire onto the whole beach (suffering a -1 to hit if they were outside max range). We also had Engineers, Bulldozers and Dozer Shermans.

Dave had set up his table (a 4' by 8') with a high bluff at the rear, sea wall and beach obstacles. Me and Martin rolled dice for preliminary air and naval bombardment.
I decided to take the right hand landings, while Martin handled the left.
Two out of five Sherman DD's made it ashore, the rest being sunk in the surf. One of those that made the beach didn't last long as an 88mm round gutted it. My infantry actually fell back into the surf seeking cover. Pinned and unable to advance, things looked a bit grim.
Thankfully reserves were on the way!
Martin at this point was doing much better than me, having had some of the defences to his front knocked out or pinned by the preliminary bombardment.
Dozer tanks get bogged down in the sand and picked off by the defenders...
With my infantry at the sea wall, and Martin's over it and amongst the defenders, the newly landed tanks move up awaiting gaps being cleared and pouring fire into the defenders. Some of the bunkers are in flamethrower range of the infantry, and are soon dealt with. The game ends as most of the defenders are killed or driven off.
But the assault was costly - we lost roughly a company on this one section, attacking with a battalion of regular US troops.
We do have some idea's as to what else we could do to better represent the landings and the fighting. Hopefully we'll be able to put these into effect soon!
Cheers to Dave for hosting and for letting me use some of his pics!


was a cool game
ReplyDeleteSpectacular pictures James, atmospheric and gorgeous!
ReplyDeleteBrilliant looking game James.
ReplyDeletePleased to see that you got a game in after all. Super beach and very impressive surf guys. Good effort!
ReplyDeleteGreat game.
ReplyDelete